> For the complete documentation index, see [llms.txt](https://docs.plenit.com/llms.txt). Markdown versions of documentation pages are available by appending `.md` to page URLs; this page is available as [Markdown](https://docs.plenit.com/docs-en/support/tutorials/windows/how-to-install-sage-50.md).
# How to install Sage 50 on a Windows server - Plenit
Discover **how to install Sage 50 on a Windows server** to improve the invoicing, accounting, and sales management operations of your SME.
Invoicing, accounting, and management programs are one of the main gears for successfully achieving a company's milestones and for bringing to a good end the commercial epic that managing an SME today entails.
Therefore, we are going to explain how\*\* to install and configure the Sage 50 software,\*\* an SP software that, after more than 35 years on the market and with more than 600,000 licenses sold, has become the best-selling software in the country and a benchmark within the Spanish national market.
Sage 50 is the evolution of Contaplus, a software that was widely used, as we have discussed. With this new version, new features and improvements are added to the existing ones. In addition to what was already included in previous versions, we can highlight its integration with Microsoft 365, improvements in menu personalization, profiles, etc., improvements in the reports and charts that can be extracted and, of course, the new mobility capabilities.
### **How to install Sage 50 on a Windows server?**
#### **Prerequisites or pre-configuration**
To successfully complete this tutorial and be able to install Sage 50 on a Windows server, you will need:
* On the one hand, be registered on the Plenit Platform with an organization and be registered in it after making [Log in](https://admin.jotelulu.com/){target="\_blank" rel="noopener"}.
* On the other hand, [having set up a Servers subscription](https://jotelulu.com/soporte/tutoriales/como-desplegar-servidor){target="\_blank" rel="noopener"}
* Have a \*\*working Windows server\*\* within the subscription.
* Have \*\*".Net Framework version 3.5"\*\* installed on the server. If it is not installed, the installation process will add it, but a restart will be required and the installer will need to be run a second time.
#### **Step 0. Decide which version is needed**
Sage 50 is available in several versions, depending on the size of the business and the users who will manage its administration.
There are three versions:
* Essential.
* Standard.
* Premium.
Below, we will look at what each one offers very superficially so that the reader has an outline and can think about which is most suitable for their business.
Essential:
* One to two users.
* Multi-user and multi-company.
* Integrated accounting.
* Management of payments, collections, and stock.
* Item management.
* Electronic invoicing.
* VAT forms.
* Online and chat support.
Standard:
* One to five users.
* Includes everything in the Essentials version plus...
* Configurable reports.
* Accounting entries.
* Personal income tax forms.
* Phone support.
Premium:
* Five users and up.
* Includes everything in Standard plus...
* Work certifications.
* List item.
* Budget accounting.
Among these, we must assess which one best fits our infrastructure and choose that one for contracting and installation.
#### **Step 1. Sage 50 installation**
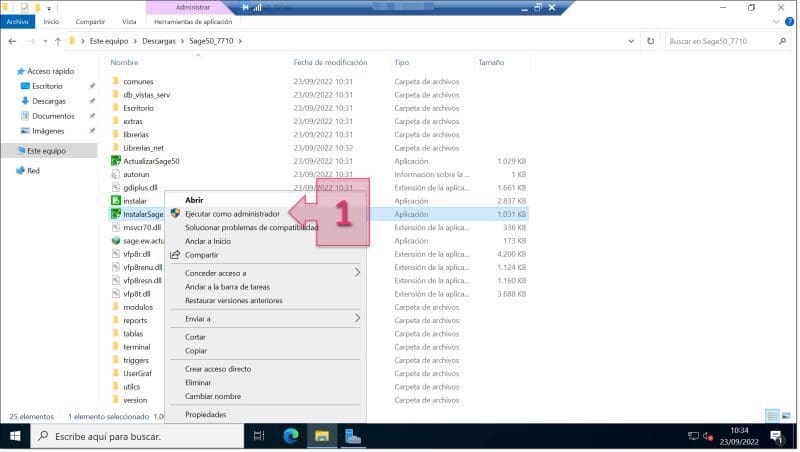
Once you have the executable version of the program, you must launch the installation with administrator permissions; to do this, you must **right-click the application and select "Run as administrator"** (1).
Step 1. We launch the Sage 50 installer with administrator permissions
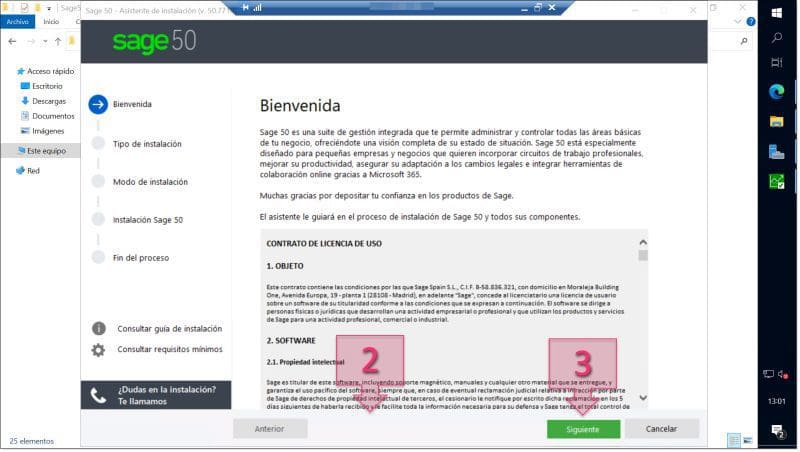
The first thing we need to do is **read the license agreement** for Sage 50. Once read, you should **accept the agreement by checking the checkbox** (2) and then **click "Next"** (3) to start the installation.
Step 1. We accept the license agreement
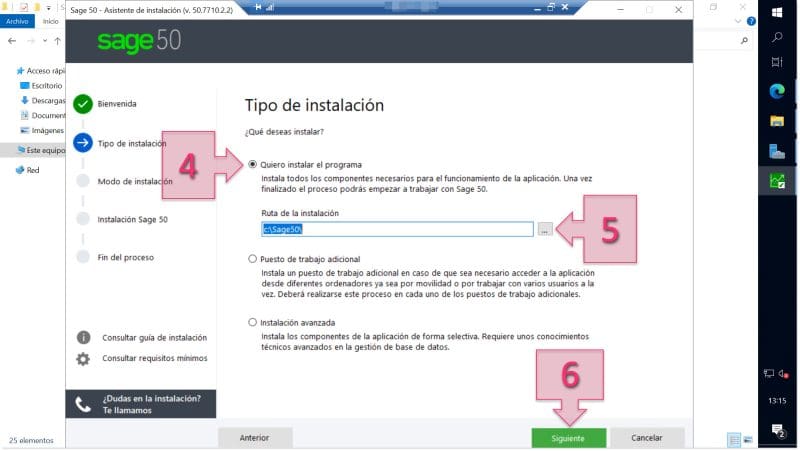
Next, you have to **select the type of installation** you want to perform, choosing from the three available:
* **I want to install the program**: An installation of the components necessary for the application to function is performed.
* **Additional workstation**: An additional machine is installed to connect to a previous installation.
* **Advanced installation**: The application components that the user wants to select are installed.
In this case, since this is the first machine on which Sage 50 is installed, you should **select "I want to install the program"** (4).
When selecting this option, a field is displayed that allows **defining the "installation path"** (5), which by default is in "c:\Sage50\\".
Once these options are selected, you should **click "Next"** (6) to continue with the installation.
Step 1. Select the Sage50 program installation for a new installation
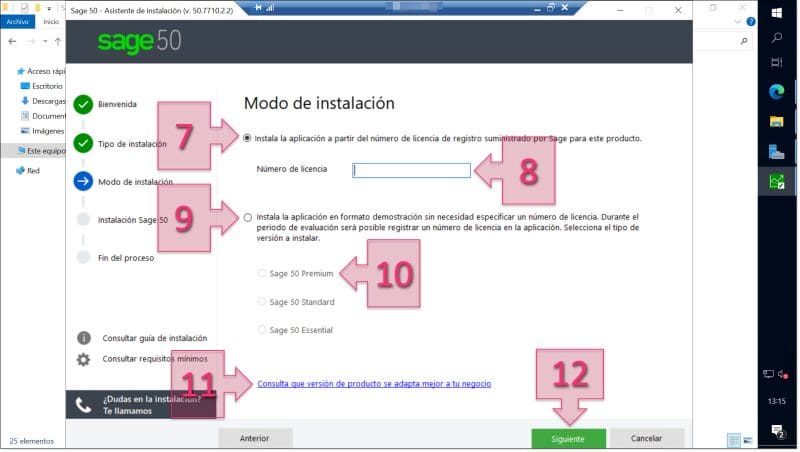
At this point, the **"Installation mode" window**, in which you must **select "Install the application using the registration license number supplied by Sage for this product"** (7).
By selecting this option, you must **enter the "License number"** (8) and if you do not have it because you are carrying out a preliminary test of the software, you are doing a **pilot deployment test**, or if you want to do a development test, you should select **"Install the application in demo mode..."** (9), and then select the **Sage version you want to install** (10) in this test, from the available ones:
* Sage 50 Premium.
* Sage 50 Standard.
* Sage 50 Essentials.
If you have any doubts, **you can consult the link "See which product version best fits your business"** (11).
Once the version to be used has been decided, you must\*\* click "Next"\*\* (12).
Step 1. We select the type of installation based on the license we have
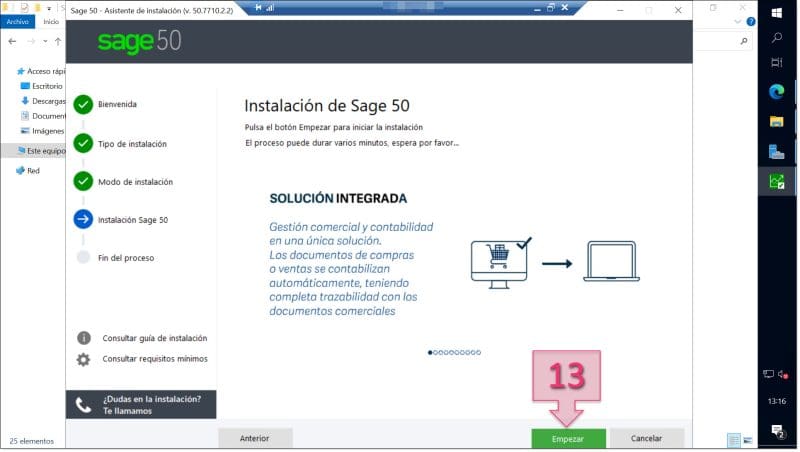
We finally arrive at the **"Sage 50 Installation" window**, where a small animation is shown presenting some of the program's features; this is a commercial presentation, not very interesting for the technician himself.
At this stage, the only thing you can do is **click "Start"** (13) to begin the deployment itself.
Step 1. We start the installation of Sage50 software on our server
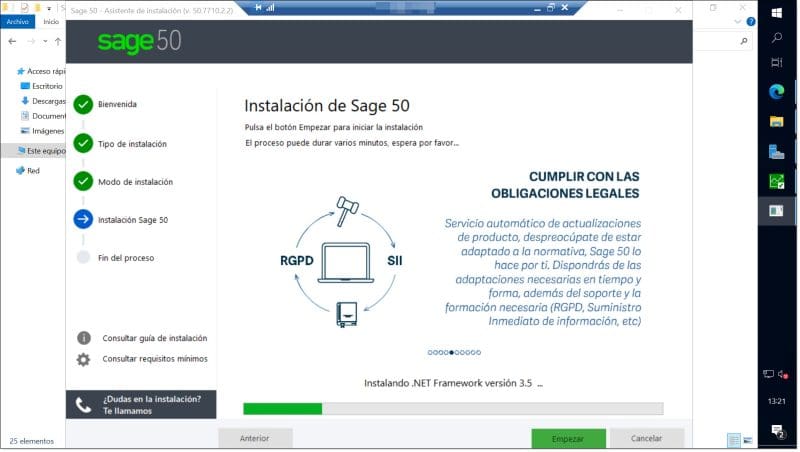
At this point, you must wait while the software installation progresses, which can be tracked through the classic progress bar where the name of the package being installed will be shown.
An interesting detail we can see in the image below these lines is that, even though the installation is taking place, the "start" button that was clicked to begin the installation can still be seen.
Step 1. We wait while the installation progresses
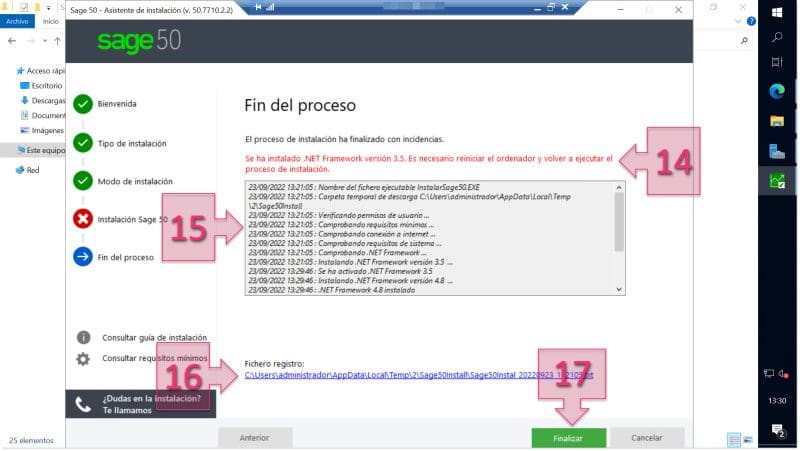
Here a small fork occurs in our tutorial. In principle, the installer is capable of deploying ".Net Framework version 3.5", but if it is already deployed on the system, the installation will continue without problems.
**If you do not have ".Net Framework version 3.5", the program will stop at this point** (14) and will request a restart so that the changes take effect on the server and the installation can be relaunched without issues.
You will be able to **view the installation log** up to this point, both on the same **screen we are on** (15), as well as by **clicking the log file** (16), which will open a Notepad window where the deployment can be seen in detail.
Finally, at this point, all that remains is to \*\*click "Finish" \*\*(17) to **restart the server** and **run the installation again**.
Step 1. If .Net Framework version 3.5 is not installed, the installation will stop
**After the restart**, you must **run the installation again**, following the **steps described above**. To keep the tutorial brief, this process will not be described again.
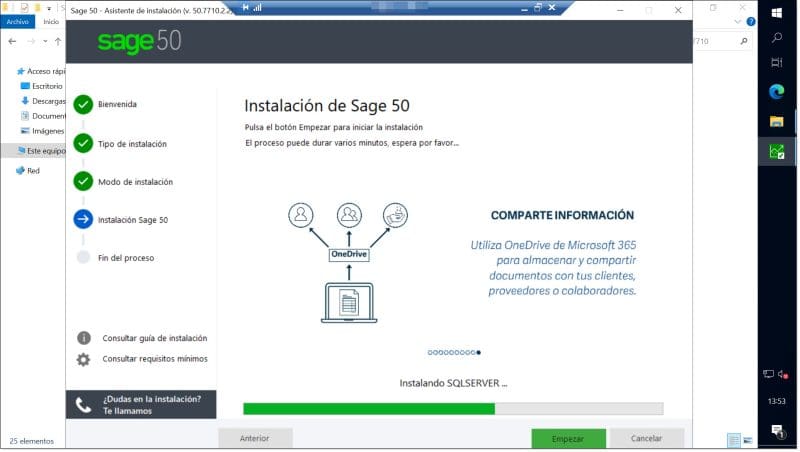
In this new launch of the application installer, **new packages will be downloaded** to install and the **the installation that will take place will be much more extensive**, since among other things **it will deploy a Microsoft SQL Server** instance to create and maintain Sage 50 databases.
Step 1. Sage 50 deploys a Microsoft SQL Server to store the application data
The part of the **installation of Microsoft SQL Server and the data load** into the database is the **longest part** of the installation, so it may be the perfect time to take a short break and enjoy a good cup of coffee.
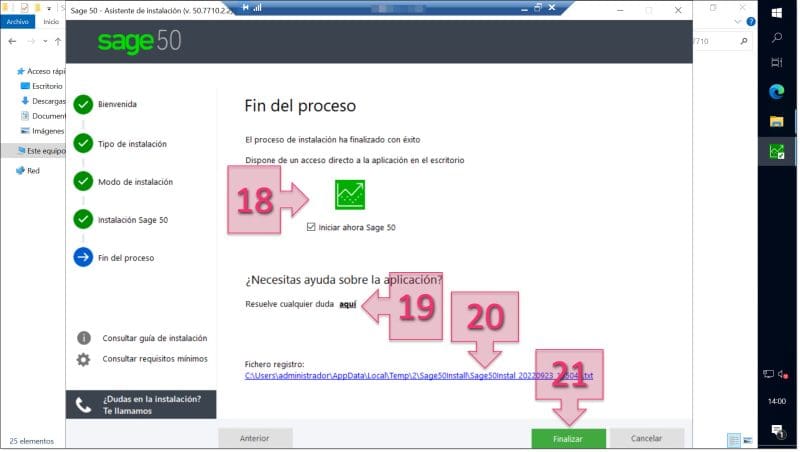
After enjoying that wonderful cup of coffee (or tea, depending on your taste), you will be able to see, if everything went well, the \*\*"End of process" screen \*\*of the Sage 50 installer. Inside it, you can see, on the one hand, the option to check or uncheck the **checkbox "Start Sage 50 now"** (18).
Personally, I prefer to leave this type of checkbox unchecked and start the application later myself, so I can test that I can launch it without problems, but those are just personal habits.
You will also be able to see a link to resolve questions and more by accessing the **Sage documentation**, by **clicking "Resolve any doubts here"** (19).
Finally, you will be able to **see the link to the installation log file** (20), which I personally always recommend checking to see in detail what has been done on the system, whether there has been any problem, etc.
To **exit the installer** program, you must \*\*click "Finish" \*\*(21), and with this the deployment of Sage 50 can be considered complete.
Step 1. Screen with the end of the Sage 50 installation process
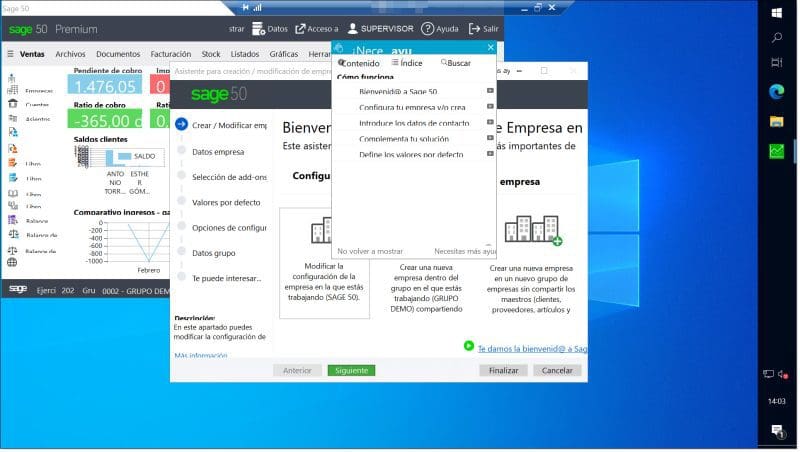
At this point, we must check that the application starts correctly and that we can operate it normally.
Step 1. We check that Sage 50 has started and that we can operate it without any problems
After this, the deployment of Sage 50 on the server can be considered complete and work with the application can begin.
### **Conclusions and next steps:**
The process described in this tutorial, how to install Sage 50 on a Windows server, allows you to install and configure the Sage 50 application in order to deploy SP software with a proper configuration aimed at improving sales, accounting, etc. This installation and configuration process is carried out in very few and very simple steps, as has been seen in this tutorial.
We hope you won't have any problems with this small guide, but if you do, don't hesitate to contact us so we can give you a hand.
Thank you for your trust!
---
# Agent Instructions
This documentation is published with GitBook. GitBook is the documentation platform designed so that both humans and AI agents can read, navigate, and reason over technical content effectively. Learn more at gitbook.com.
## Querying This Documentation
If you need additional information that is not directly available in this page, you can query the documentation dynamically by asking a question.
Perform an HTTP GET request on the current page URL with the `ask` query parameter, and the optional `goal` query parameter:
```
GET https://docs.plenit.com/docs-en/support/tutorials/windows/how-to-install-sage-50.md?ask=&goal=
```
`ask` is the immediate question: it should be specific, self-contained, and written in natural language.
`goal` is optional and describes the broader end goal you are ultimately trying to accomplish on behalf of the user. GitBook uses it to tailor the answer towards what is most useful for that goal.
The response will contain a direct answer to the question and relevant excerpts and sources from the documentation.
Use this mechanism when the answer is not explicitly present in the current page, you need clarification or additional context, or you want to retrieve related documentation sections.