> For the complete documentation index, see [llms.txt](https://docs.plenit.com/llms.txt). Markdown versions of documentation pages are available by appending `.md` to page URLs; this page is available as [Markdown](https://docs.plenit.com/docs-en/support/tutorials/windows/how-to-create-a-spanned-volume-windows-server-2022.md).
# How to deploy a spanned volume in Windows Server 2022
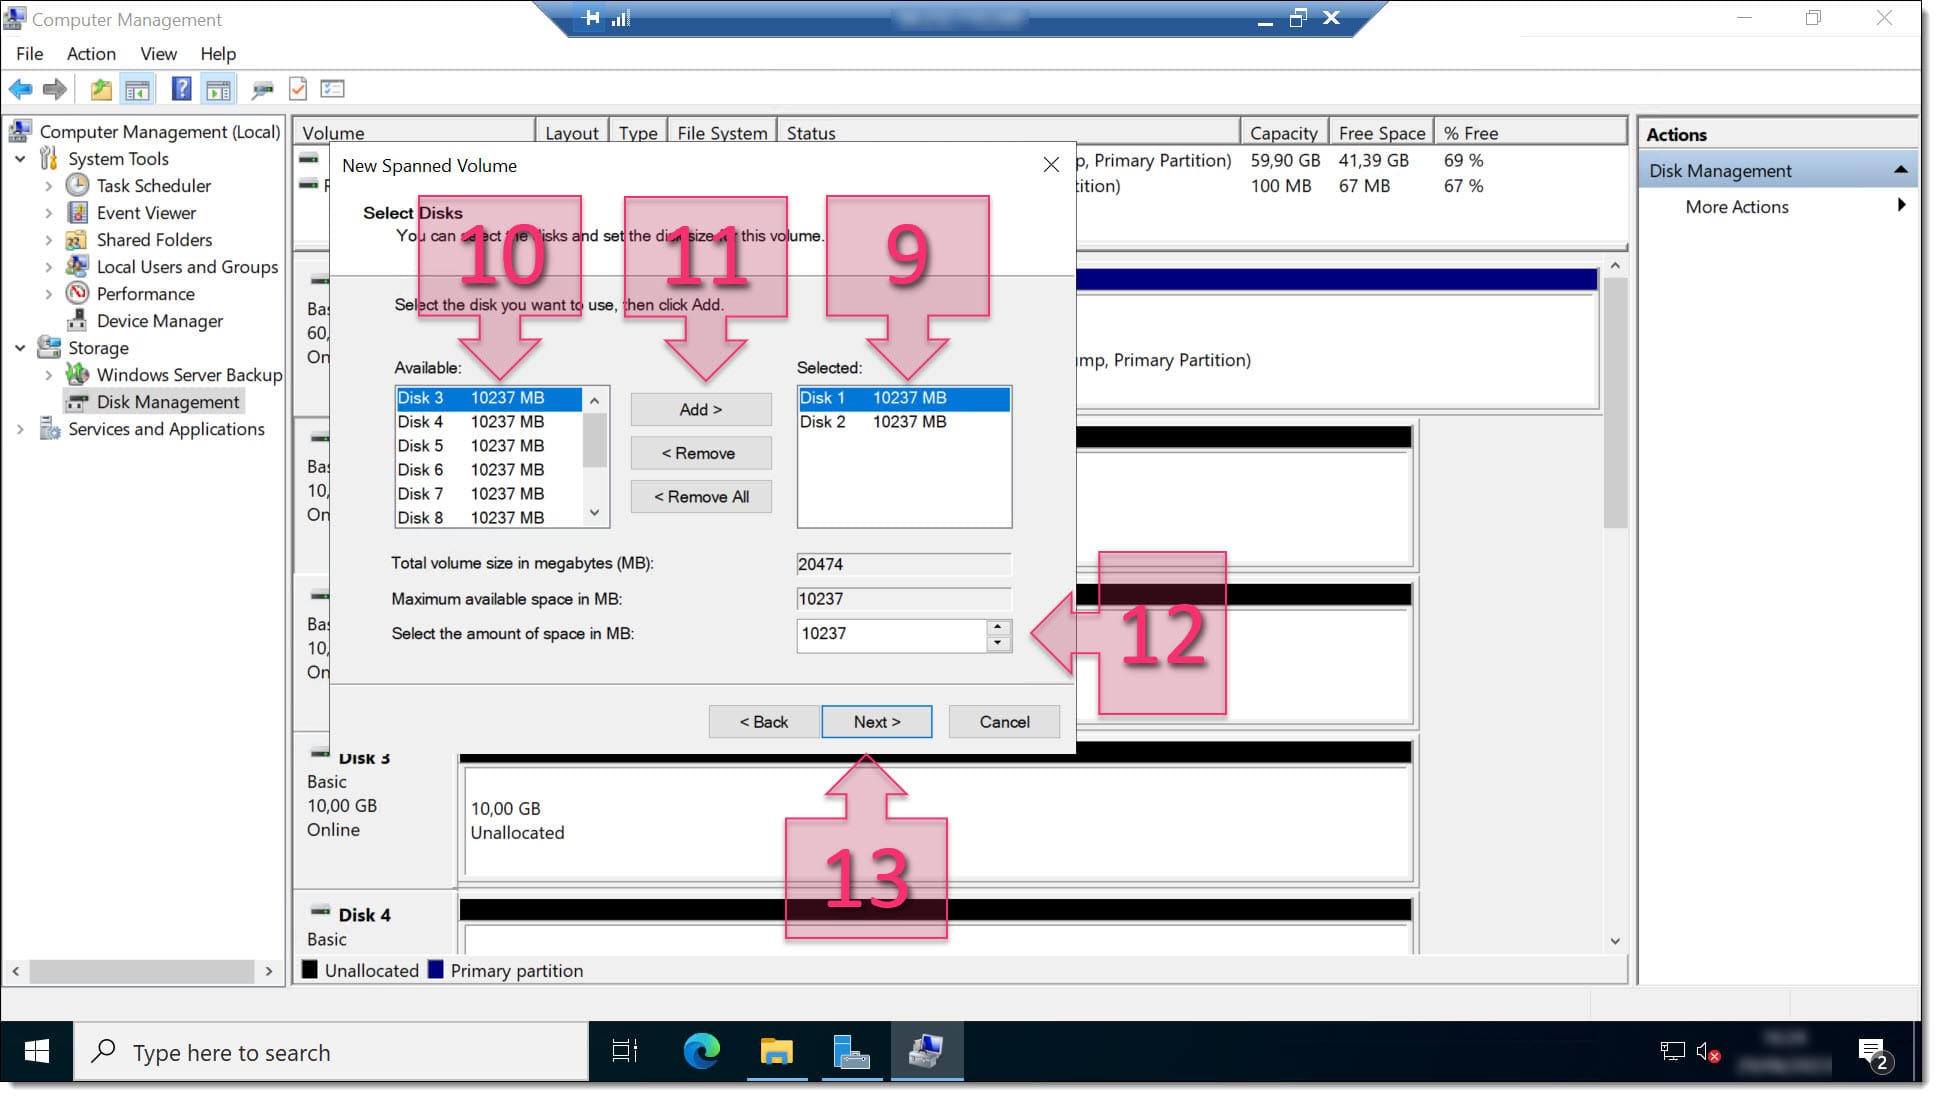
developed like the one deployed by Plenit on its disk servers, so this model, **can slightly speed up the process, you must select "New Spanned Volume" (6). disks** (10), which must have the same size as the volume size\*\* (12) that will be generated after finishing the deployment, and you will need to do **click "Next"** (13). disks to dynamic\*\* since they were basic, this is part of the disk size and the power of the equipment. You will be able to continue the distributed Spanned Volume in Windows Server 2022\*\*, it can also be applied to some Microsoft Windows Client systems such as
Deploy a distributed disk (Spanned Volume) in Windows Server 2022 and group several disks into a single logical drive from Disk Manager.
In this tutorial, you work with the system of **distributed disks**, also presented here as **RAID 0** or **Spanned Volume** on Microsoft servers. This model distributes the information across several disks, but **does not offer real redundancy against failures**, so it should not replace a backup policy.
Do not use this configuration as a replacement for backups. It is an additional availability mechanism, but it does not replace a well-defined backup strategy.
### How to deploy a distributed disk (Spanned Volume) in Windows Server 2022
### Before you start
Complete these steps before starting the configuration:
* Log in to the platform from [Log in](https://admin.jotelulu.com/login).
* Make sure you have an **Servers** active subscription. If you have not created it yet, see [How to deploy a new server in Plenit](https://docs.jotelulu.com/docs/como-desplegar-servidor).
* Access the Windows Server 2022 server where you are going to create the volume.
* Check that you have the disks available that you are going to group within the new volume.
### Step 1. Open Computer Management
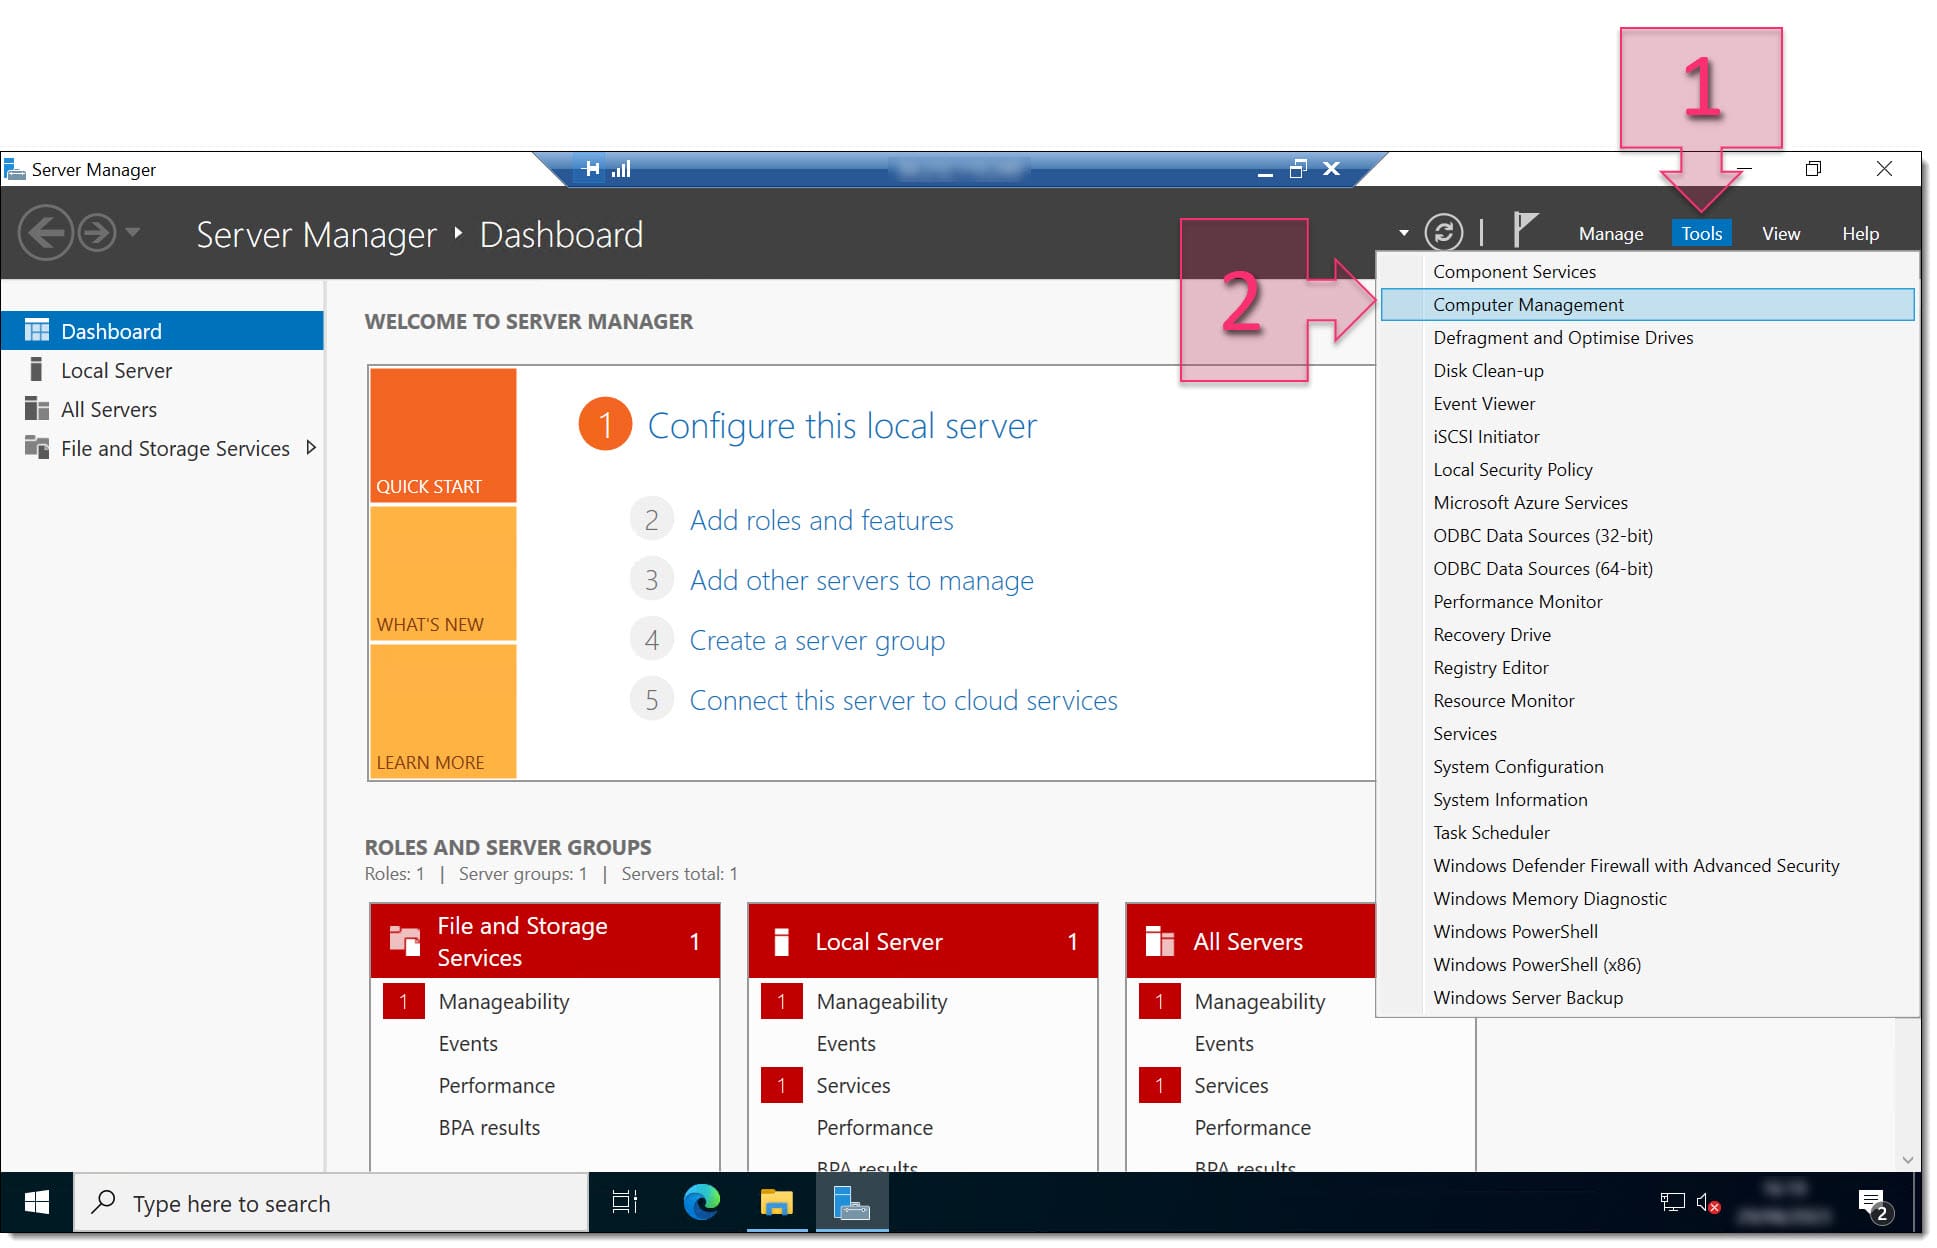
In **Server Manager**, open **Tools** (1) and select **Computer Management** (2).
\\
### Step 2. Review the available disks
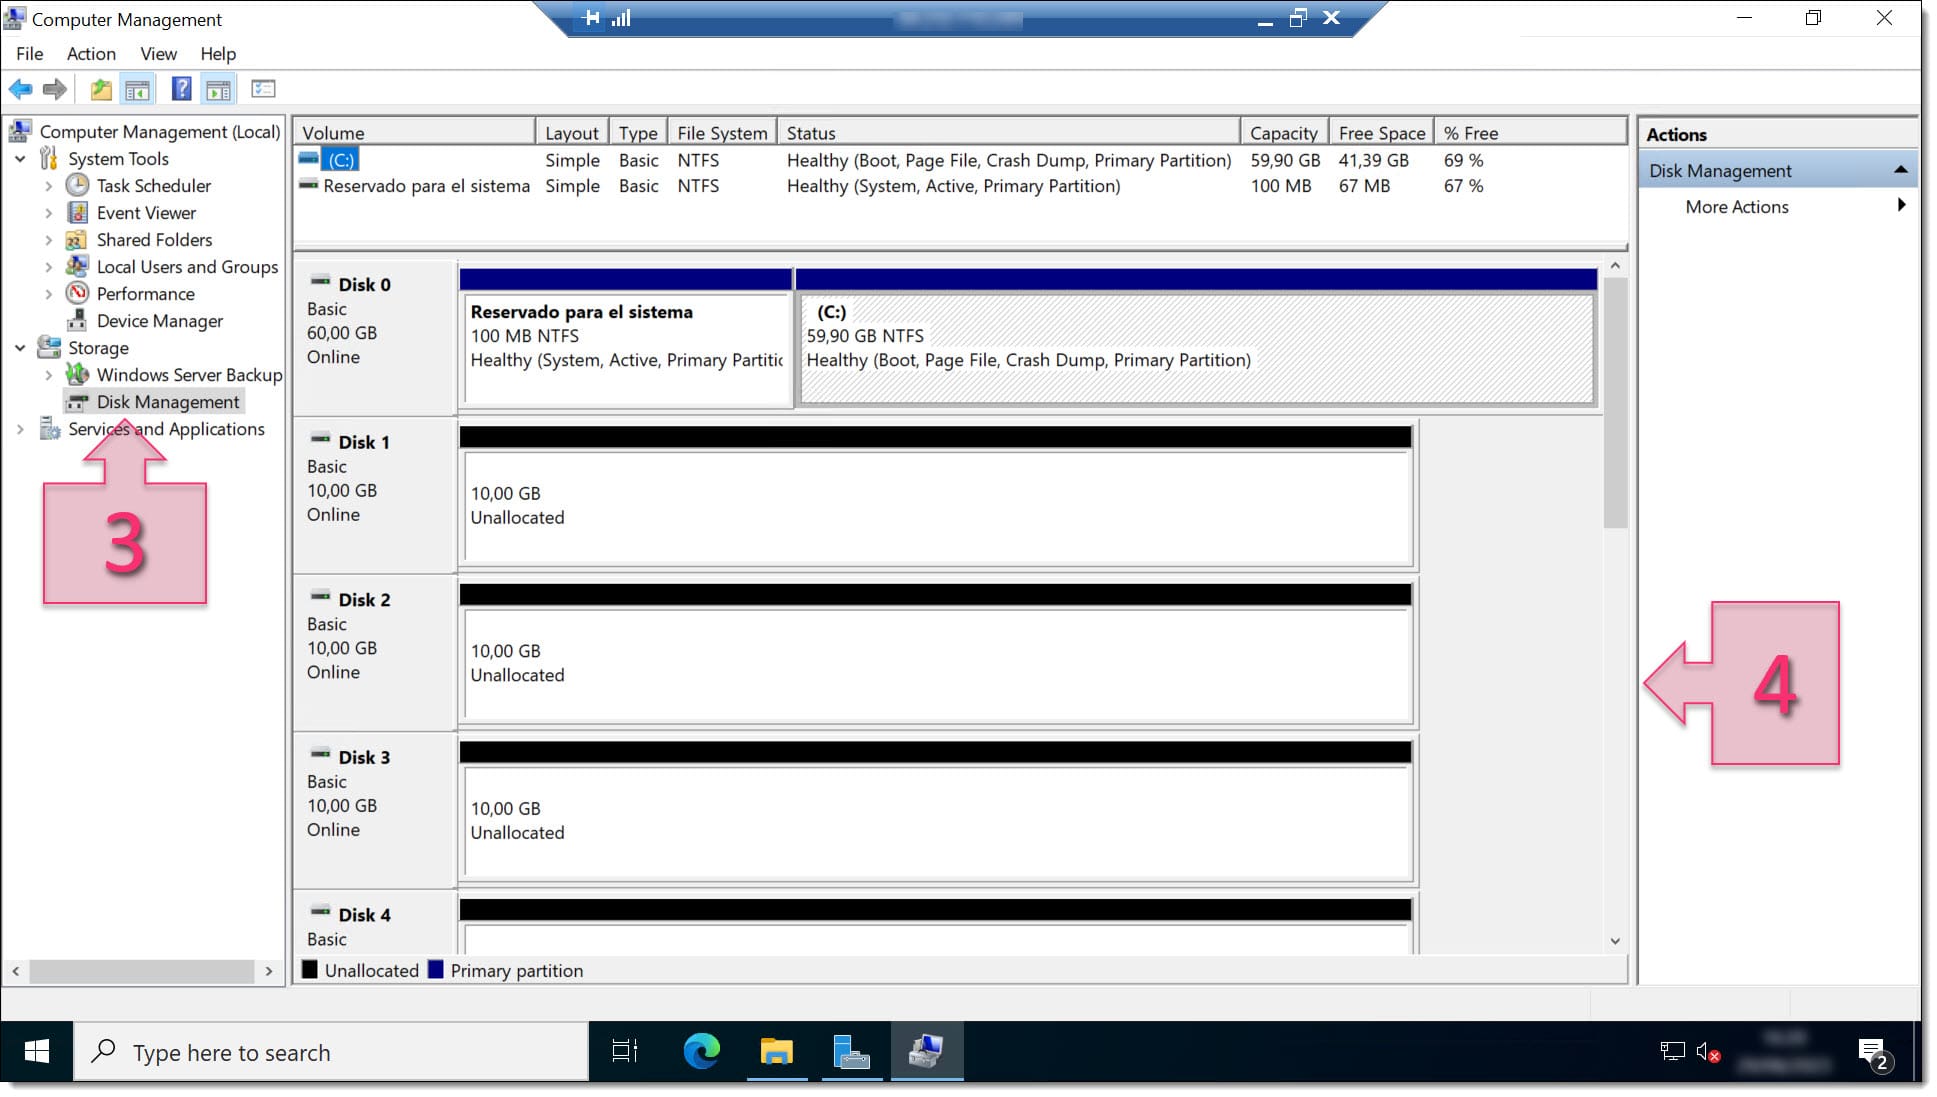
Inside **Computer Management**, go to **Storage > Disk Management** (3) and review the available disks to decide which ones you are going to use.
\\
### Step 3. Start the New Spanned Volume wizard
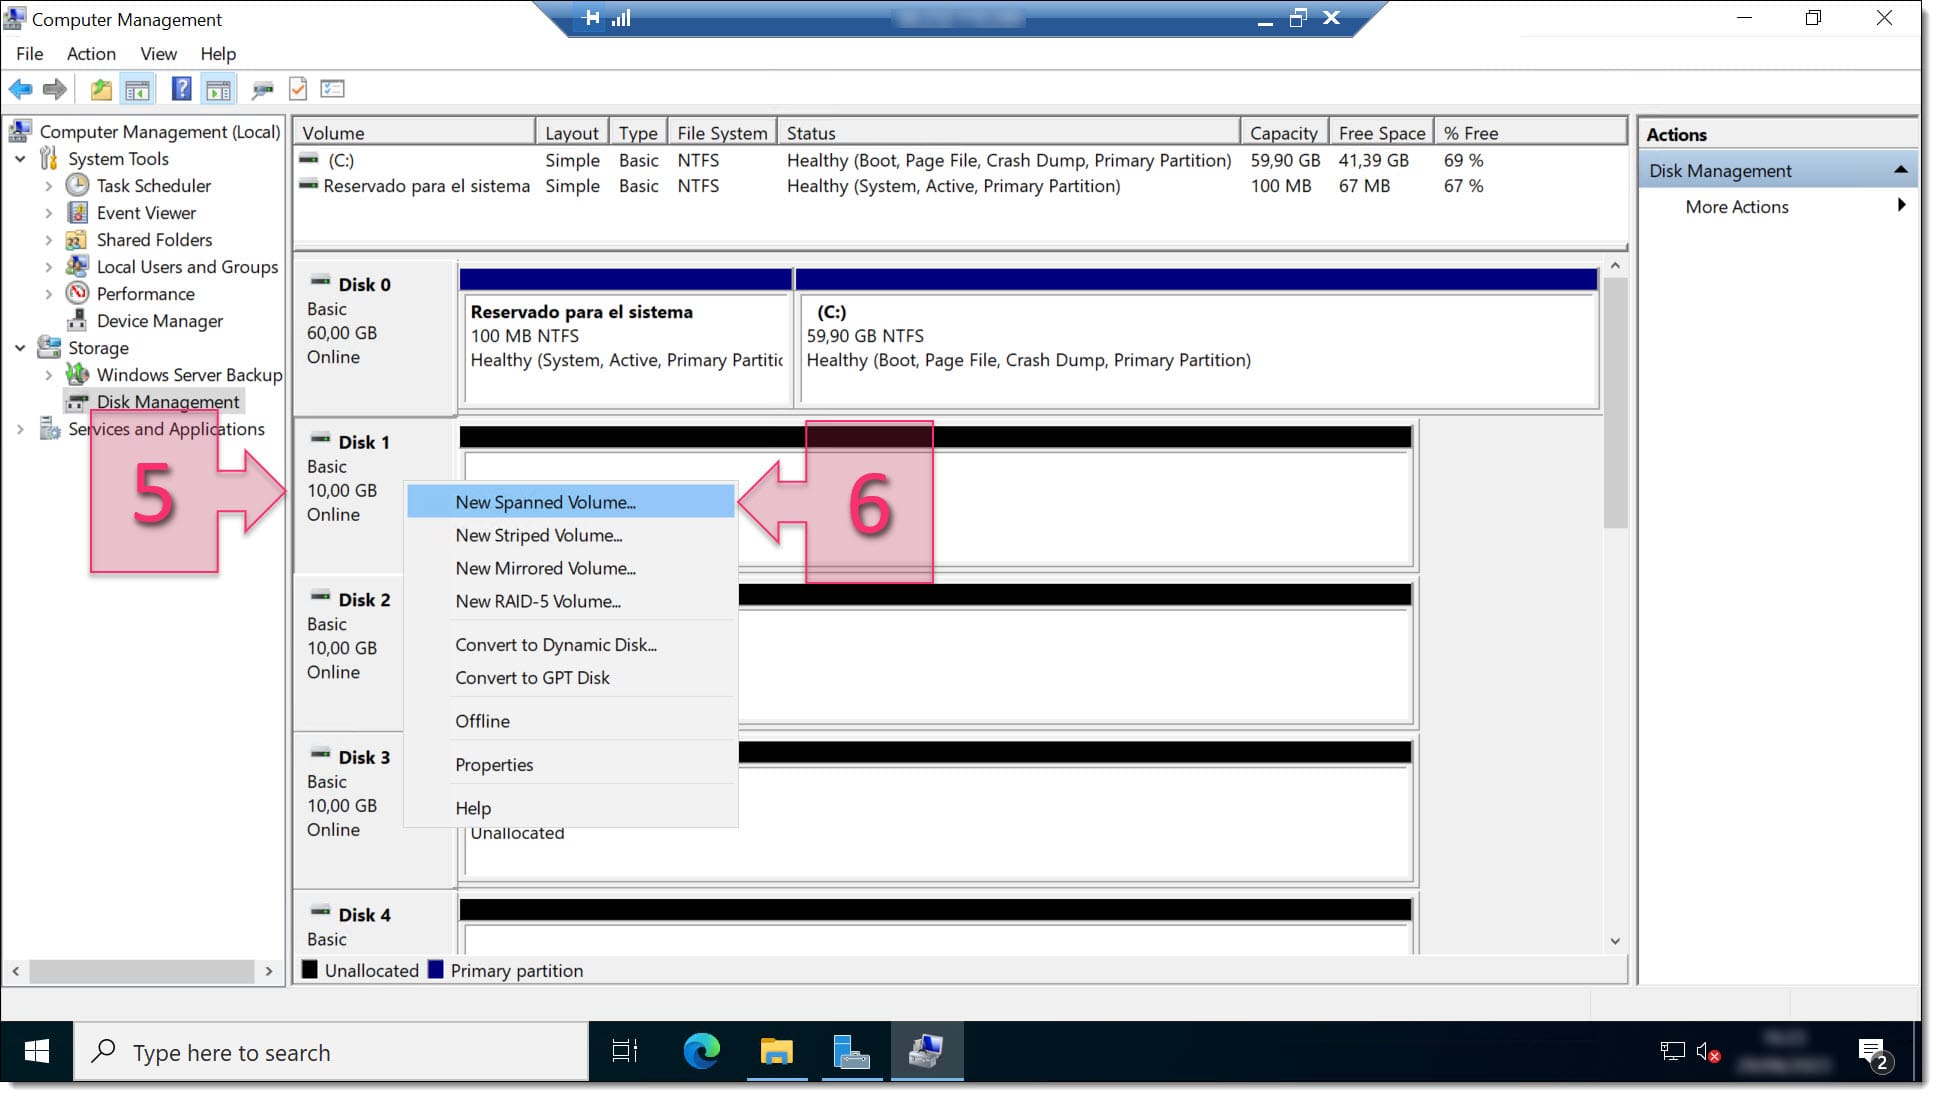
Right-click one of the disks (5). You will see several volume options:
* **Spanned**
* **Striped**
* **Mirrored**
* **RAID-5**
In this case, select **New Spanned Volume** (6).
\\
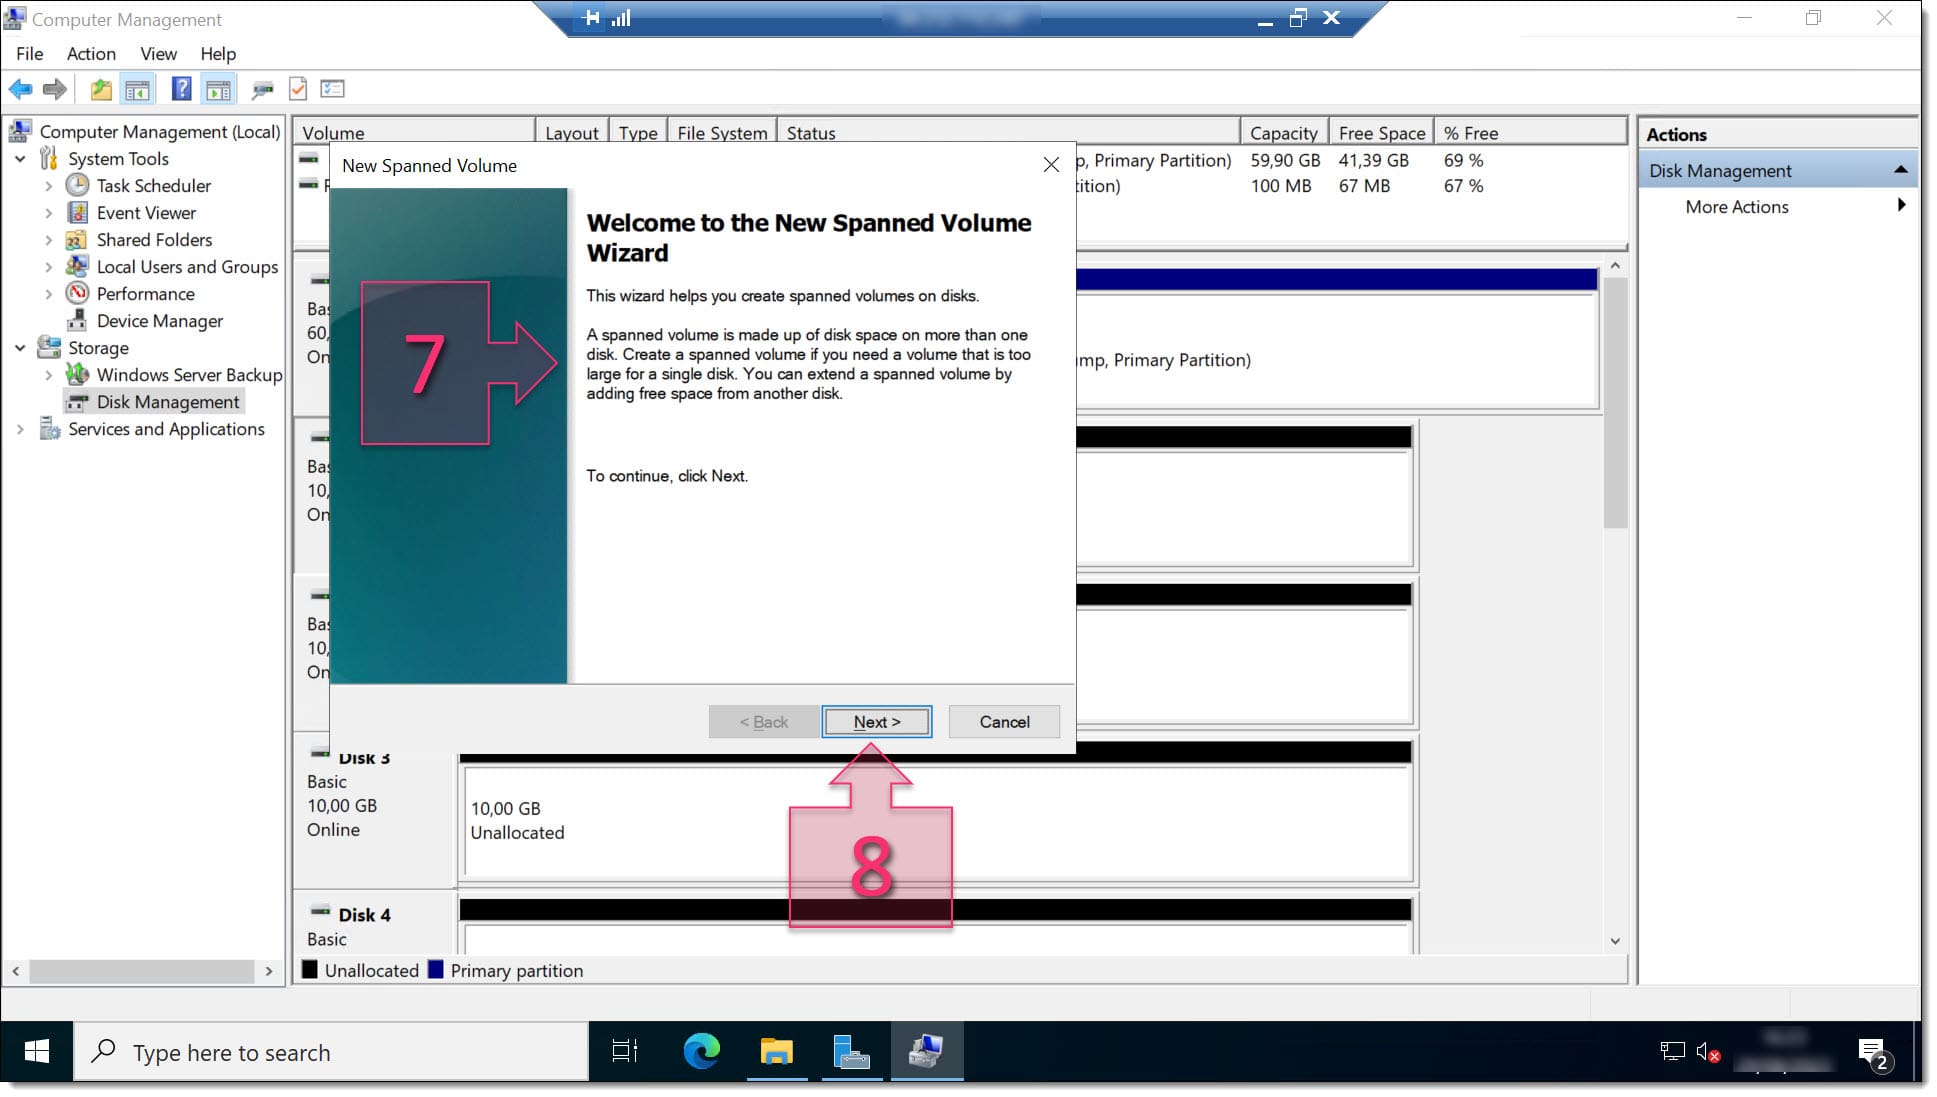
The Windows wizard will open. Review the introduction and click **Next** (8) to continue.
\\
### Step 4. Add the disks to the new volume
Select one of the available disks (10), click **Add >** (11) and check that it appears within the group of selected disks (9).
On this same screen you can see the final size of the volume (12) and adjust it if needed. When ready, click **Next** (13).
\\
### Step 5. Assign a drive letter
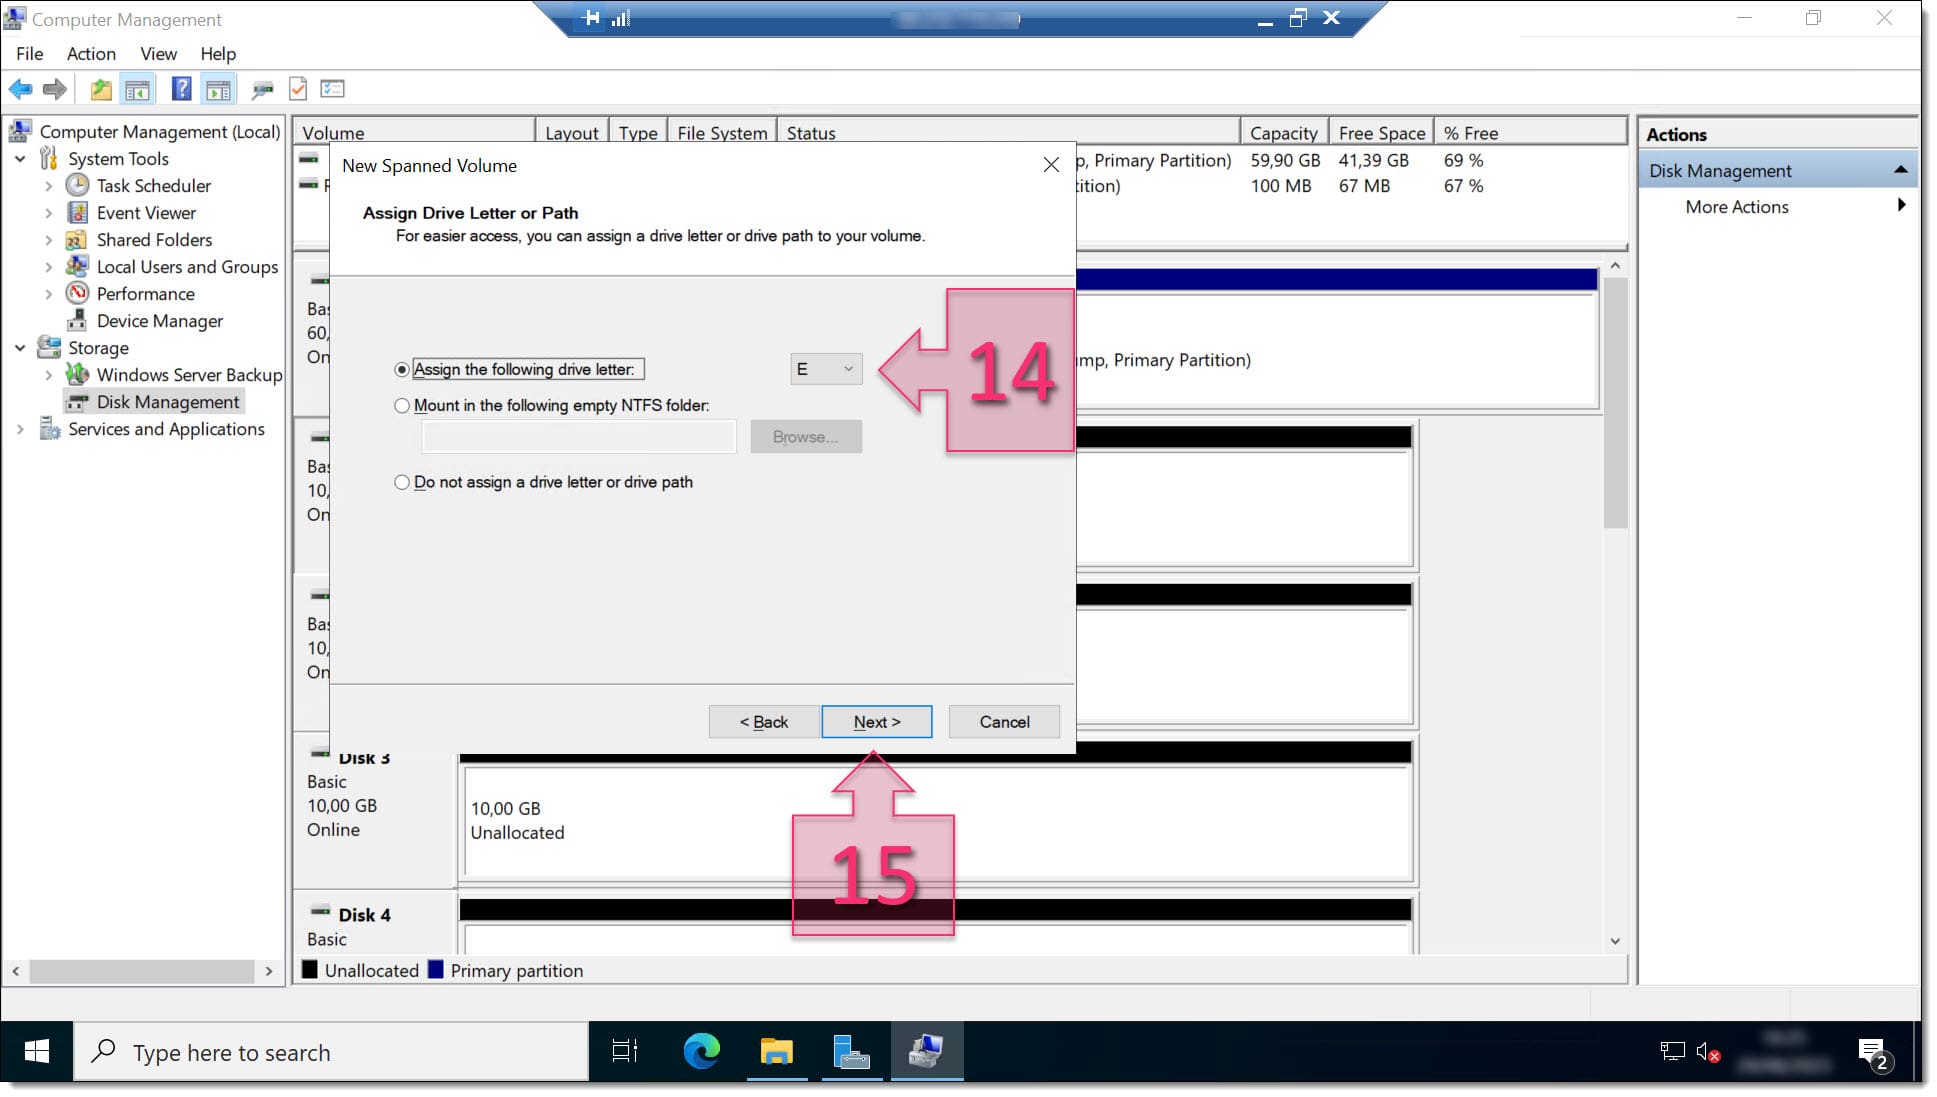
Now decide how you want to present the volume in the operating system. In this case, select **Assign the following drive letter** (14) and assign the drive letter you prefer. Then click **Next** (15).
\\
### Step 6. Format and name the volume
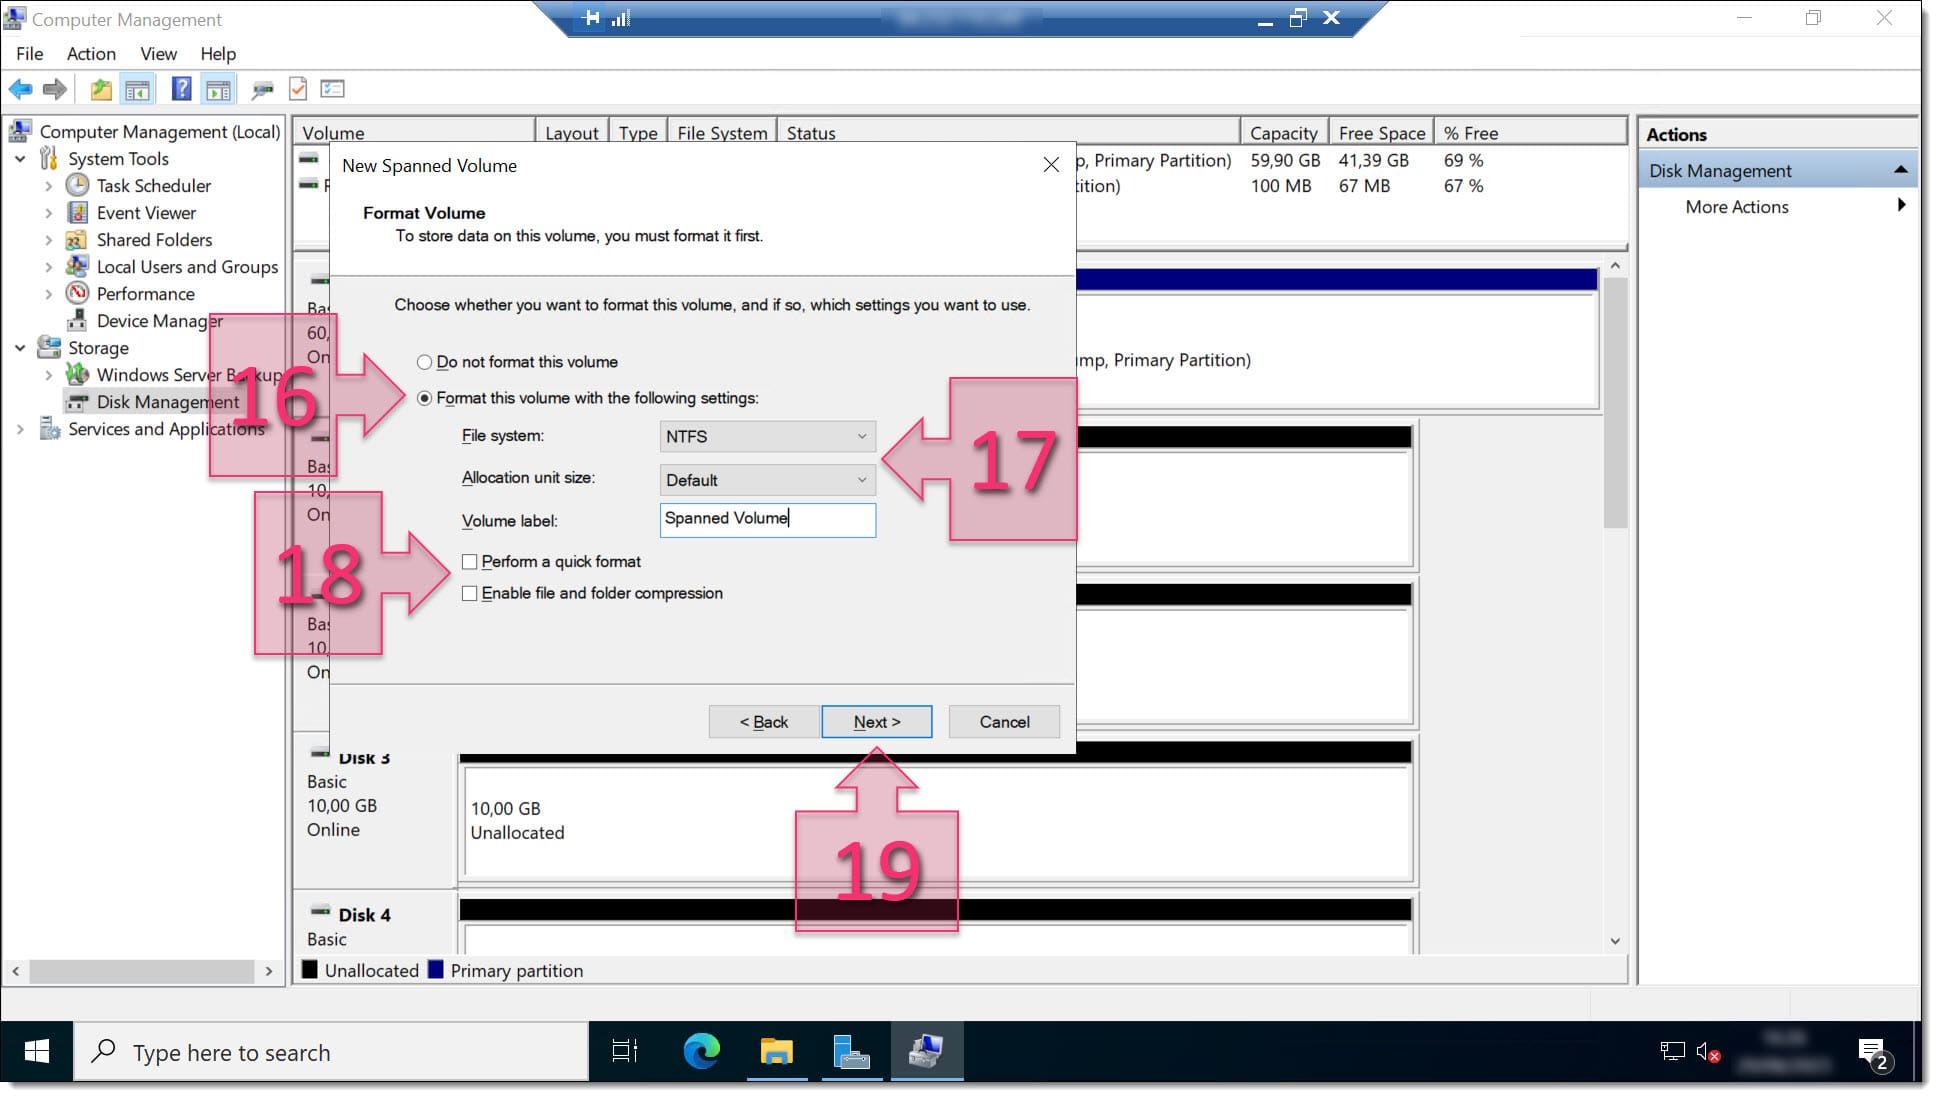
On the next screen, define whether you want to format the disk (16). In this example, the volume is formatted and **NTFS** is selected as the file system (17).
Here you can also configure:
* the cluster size,
* the volume name,
* quick format,
* and drive compression (18).
When finished, click **Next** (19).
\\
### Step 7. Review the configuration and finish
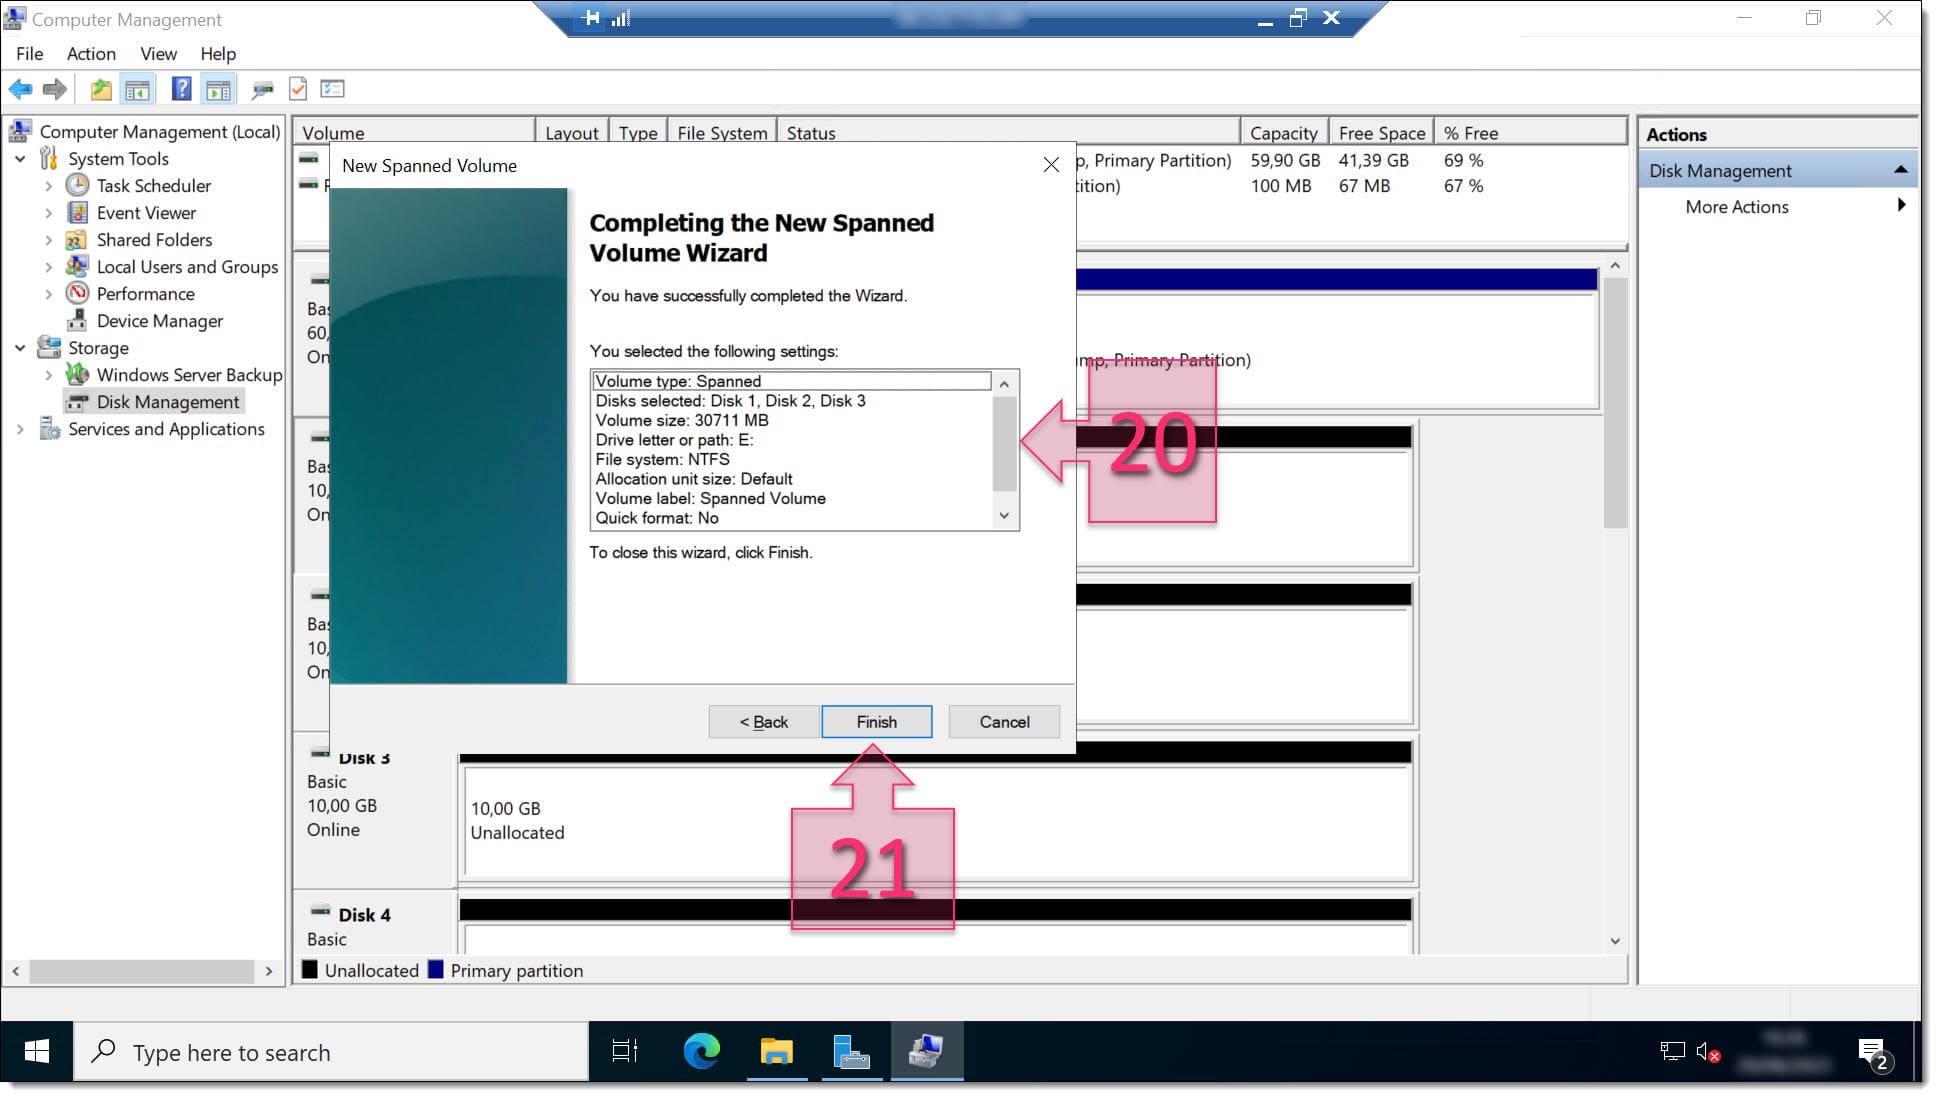
Review the selected configuration (20) and, if everything is correct, click **Finish** (21) to start creating the volume.
\\
### Step 8. Confirm the conversion to dynamic disks
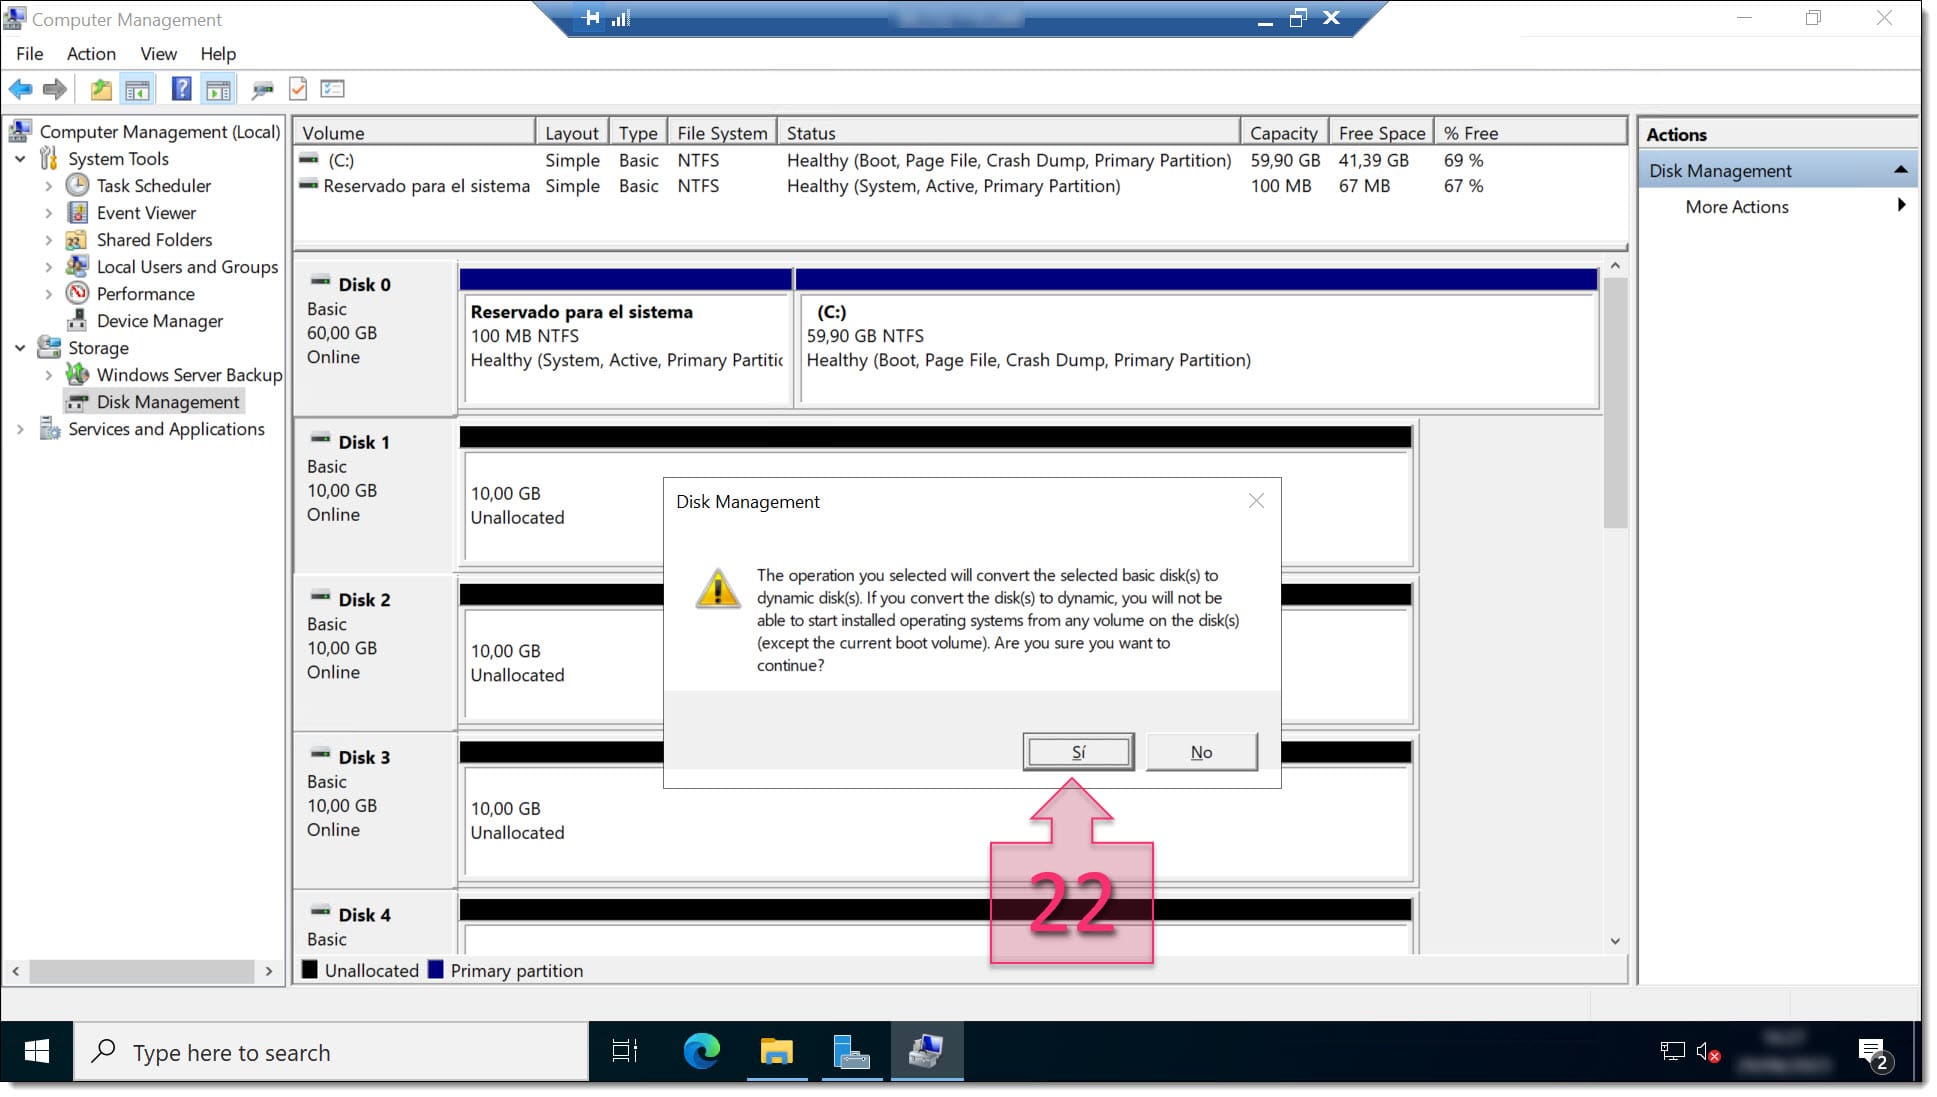
During the process, Windows will ask to convert the disks from basic to dynamic. Click **Yes** (22) to continue.
\\
### Step 9. Wait for the deployment to finish and verify the result
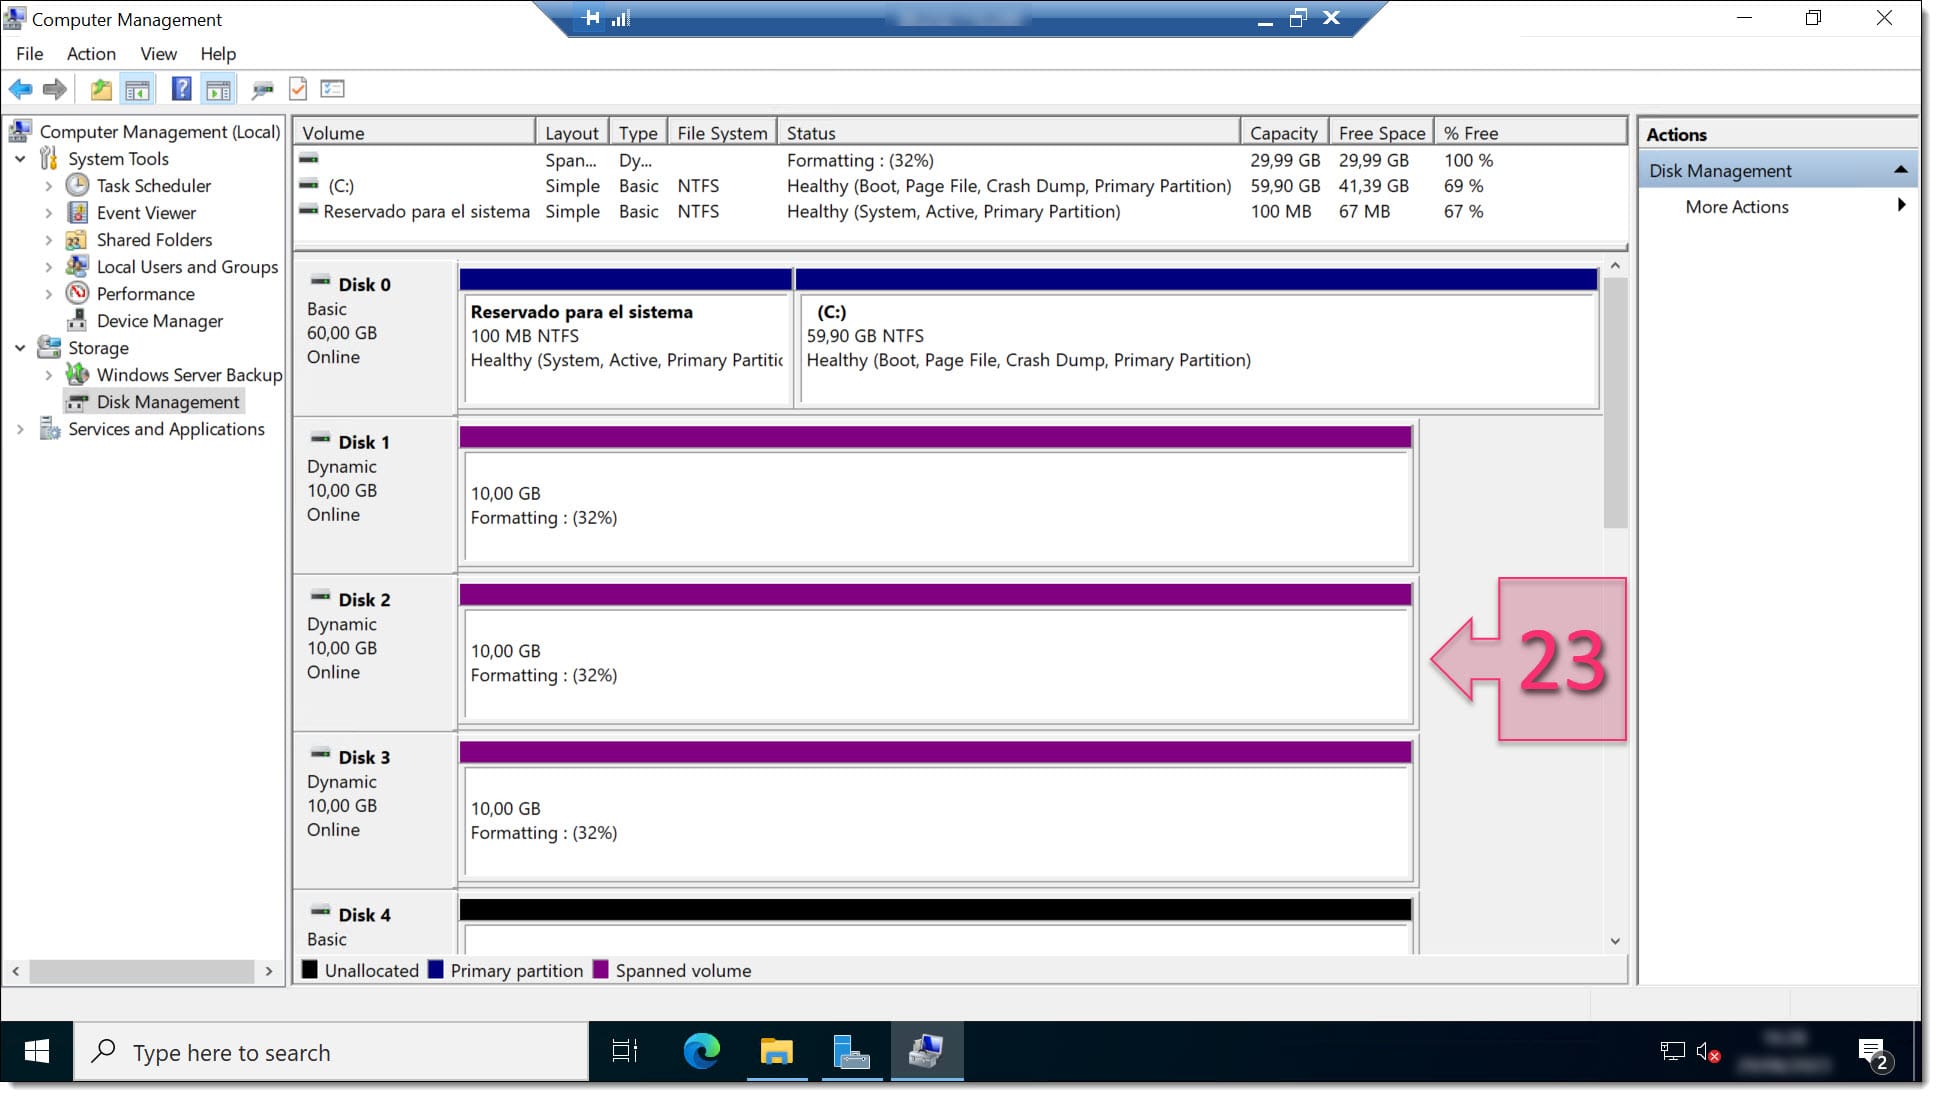
Wait while the volume creation completes. The time may vary depending on the size of the disks and the power of the server. During the process you will be able to see the progress on each disk (23).
When finished, the disks used should show the status **Healthy**.
\\
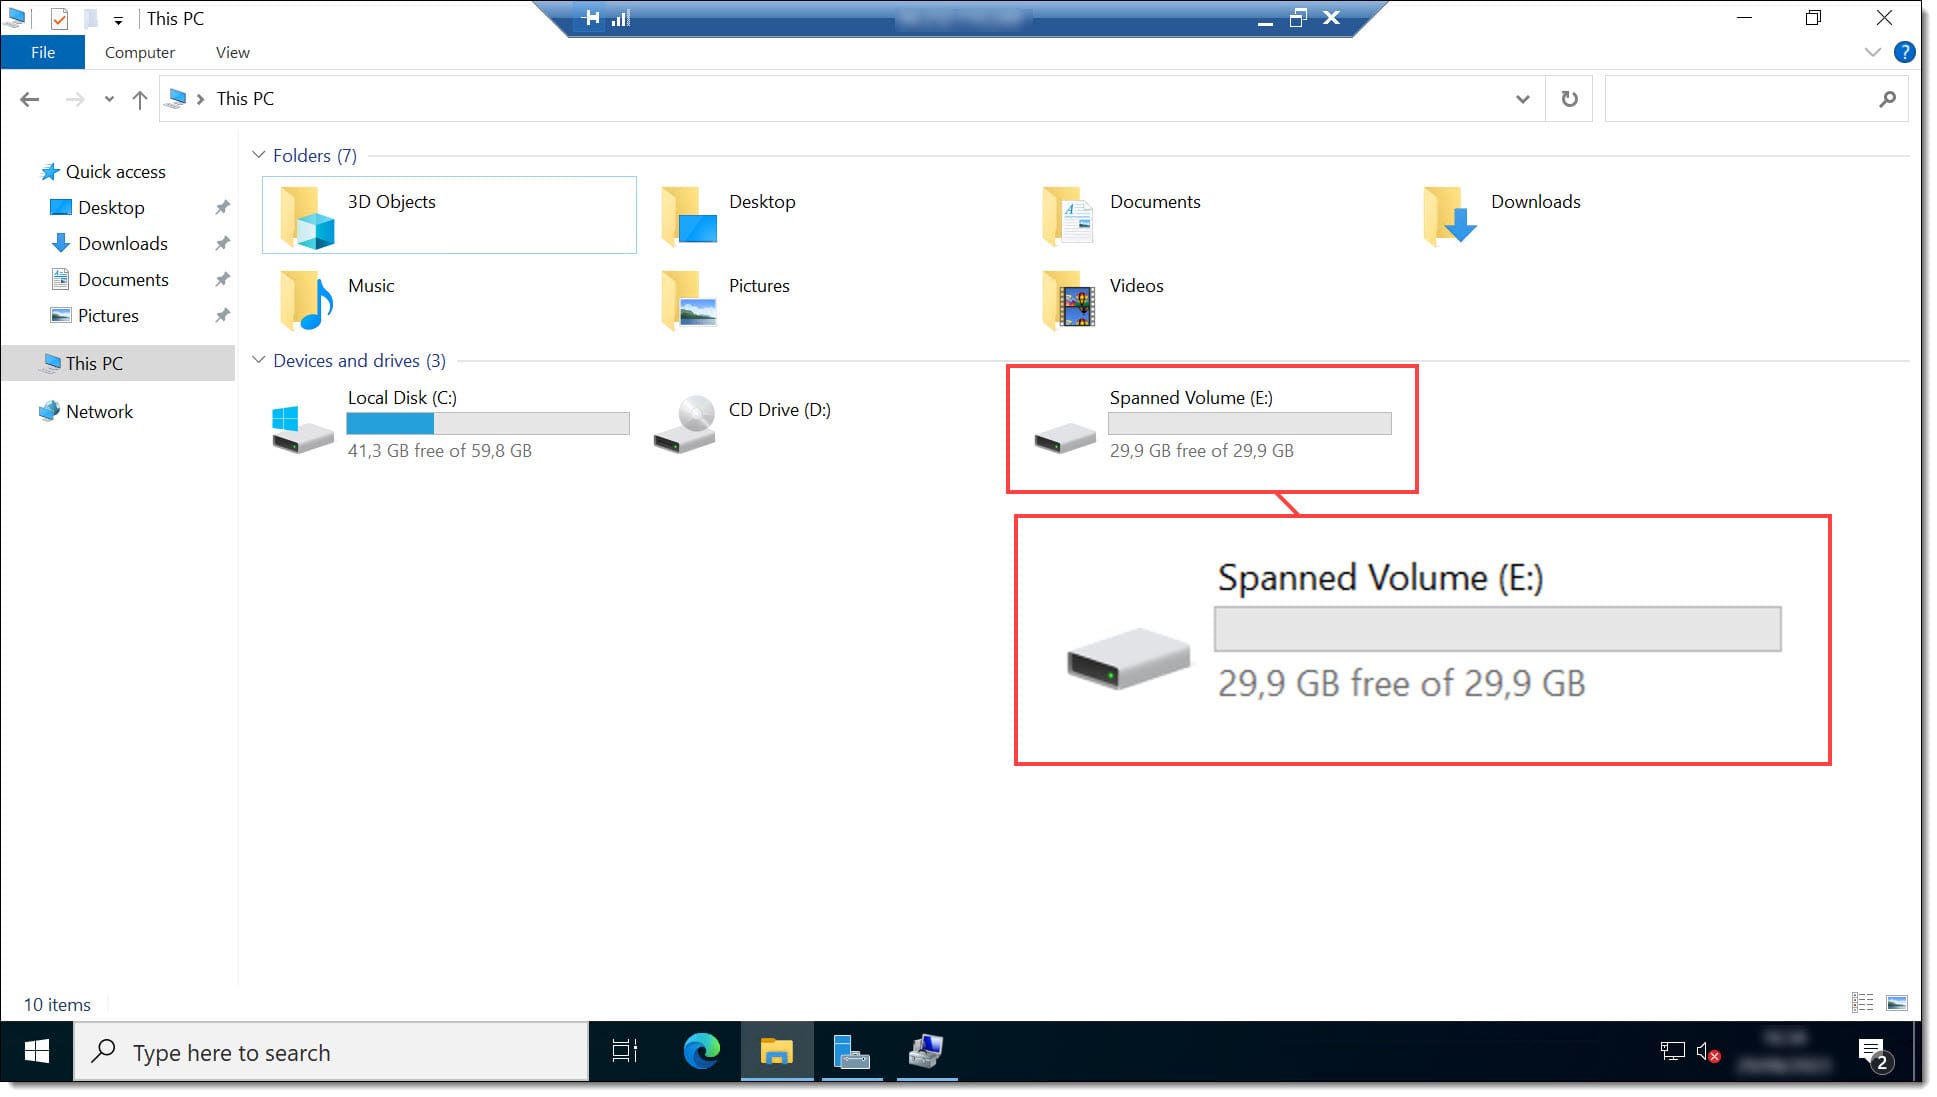
Then, open the **Windows Explorer** and check that the new drive appears with the configured size and letter.
\\
### Conclusion and next steps
With this process you can create a distributed disk (Spanned Volume) in Windows Server 2022 from Disk Management wizard. The flow is very similar in Windows Server 2016 and 2019, and can also be applied with slight variations to Windows 10 and Windows 11.
If you want to continue expanding related information, also check the [Plenit blog](https://jotelulu.com/blog/).
Likewise, we recommend you [visit our blog](https://jotelulu.com/blog/){target="\_blank" rel="noopener"} to see similar content.
Thank you for your trust!
---
# Agent Instructions
This documentation is published with GitBook. GitBook is the documentation platform designed so that both humans and AI agents can read, navigate, and reason over technical content effectively. Learn more at gitbook.com.
## Querying This Documentation
If you need additional information that is not directly available in this page, you can query the documentation by asking a question.
Perform an HTTP GET request on the following URL with the `ask` and `goal` query parameters:
```
GET https://docs.plenit.com/docs-en/support/tutorials/windows/how-to-create-a-spanned-volume-windows-server-2022.md?ask=&goal=
```
`ask` is the immediate question: it should be specific, self-contained, and written in natural language.
`goal` is what the user is ultimately trying to achieve, the reason they need the answer. Sharing it helps GitBook give you a better, more relevant answer. A goal is most helpful when it describes the outcome the user wants rather than restating the question. For example, with `ask=how do I create an API token`, a goal like `automate deployments from our CI pipeline` lets GitBook tailor the answer to that use case.
The response will contain a direct answer to the question and relevant excerpts and sources from the documentation.
Use this mechanism when the answer is not explicitly present in the current page, you need clarification or additional context, or you want to retrieve related documentation sections.