> For the complete documentation index, see [llms.txt](https://docs.plenit.com/llms.txt). Markdown versions of documentation pages are available by appending `.md` to page URLs; this page is available as [Markdown](https://docs.plenit.com/docs-en/productos/servers/how-to/how-to-create-a-vpc-and-associate-a-tier.md).
# How to Create a VPC and Associate a TIER in Plenit
A VPC lets you organize the network of your Server environment into separate subnets, called TIERs.
In this tutorial, you create a VPC and associate its first TIER, the foundation for layering segmentation (application, database) or for setting up a VPN between networks later.
> #### 👍 What you get
>
> A created VPC network with an associated TIER, ready for your servers to connect to it and for you to define access from outside.
### What a VPC is and what a TIER is
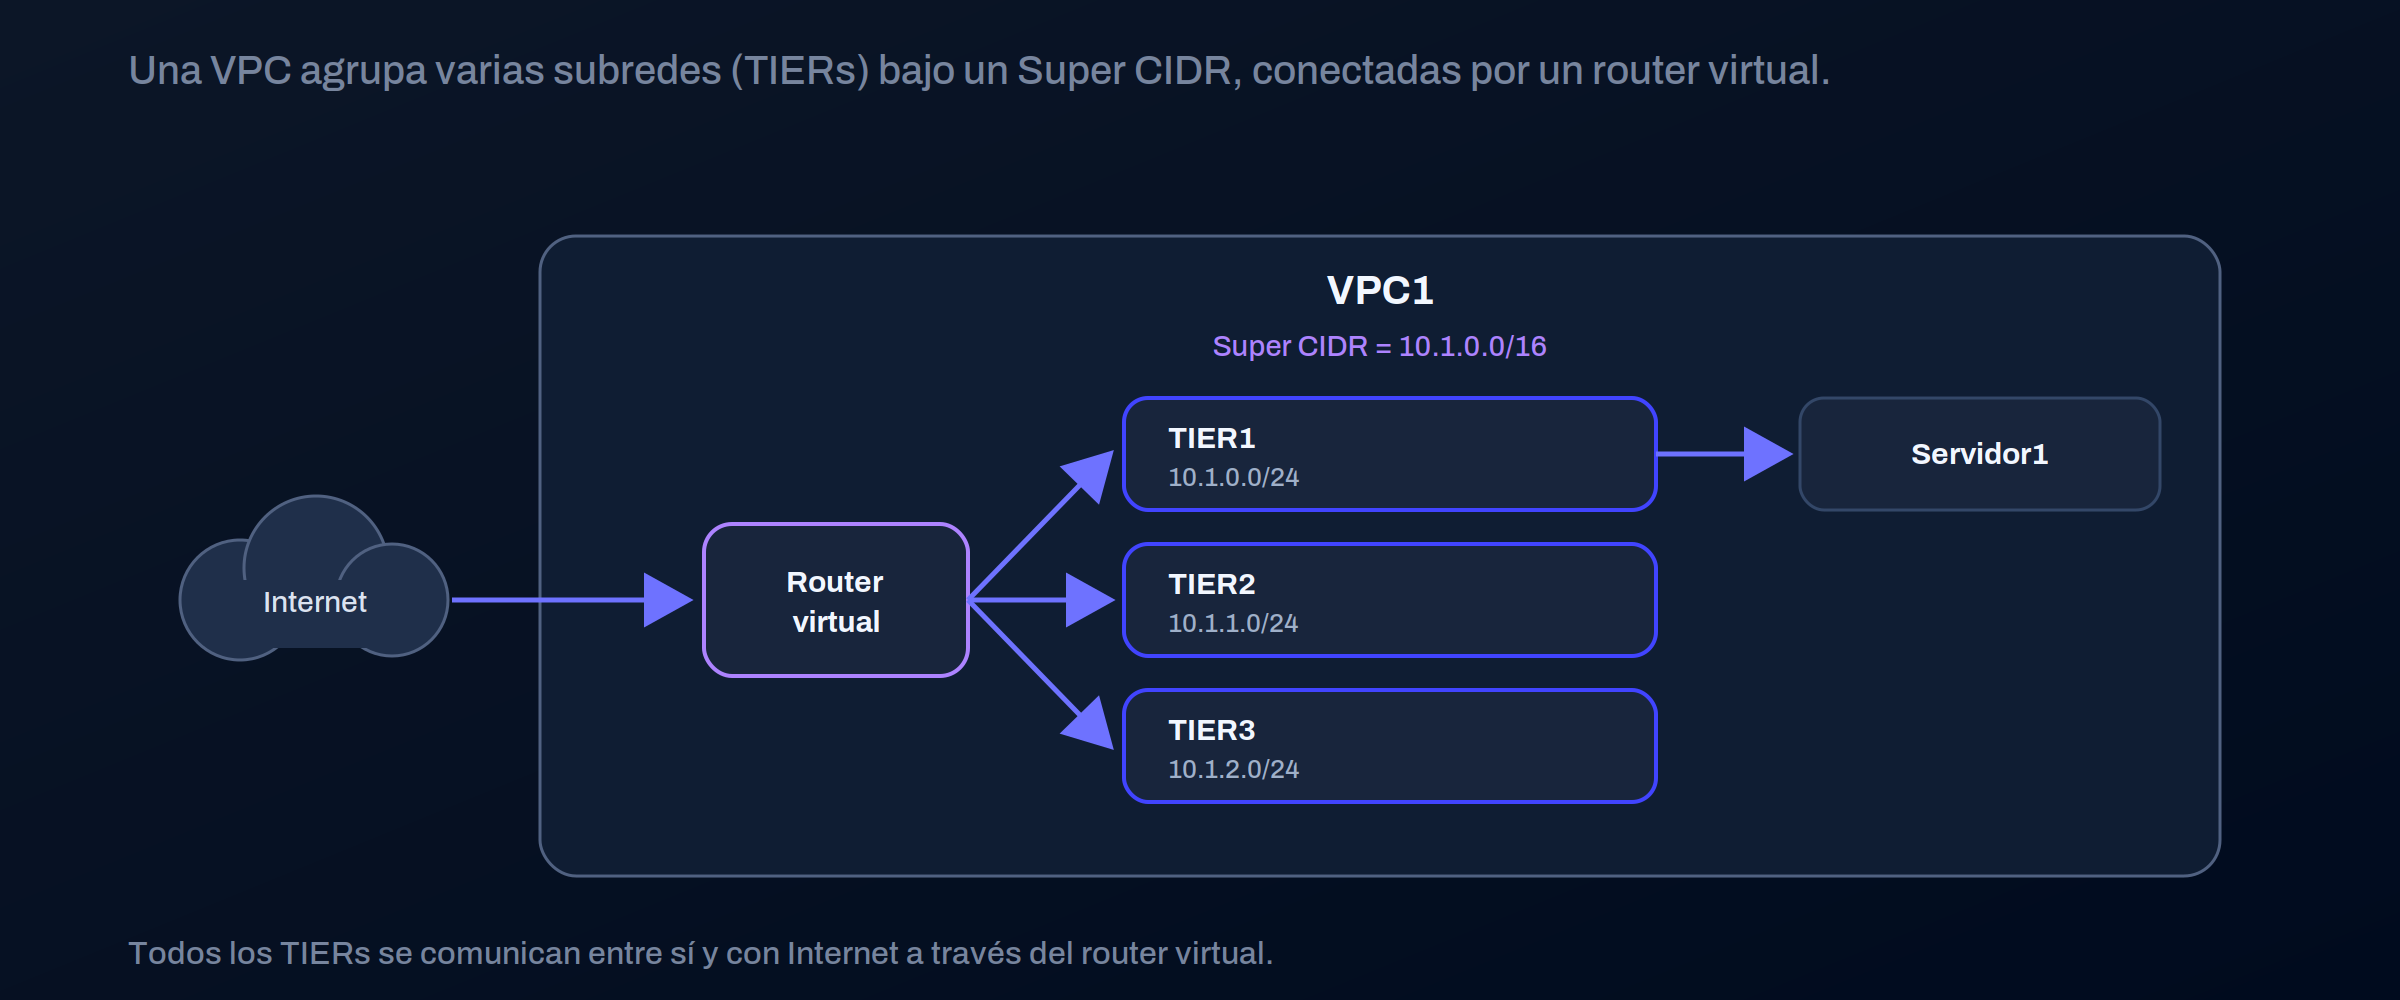
A VPC is defined with a **Super CIDR**, the main network that contains all the subnets. Each subnet is a **TIER**, which corresponds to a VLAN. All the TIERs in a VPC communicate with each other and with the Internet through a virtual router.
| Concept | What it is |
| -------------- | ------------------------------------------------------------------------------------ |
| Super CIDR | The global range of the VPC, within which the TIERs live (for example `10.1.0.0/16`) |
| TIER | A subnet within the VPC (for example `10.1.0.0/24`) |
| Virtual router | What connects the TIERs to each other and to the Internet |
> #### 📘 Why segment into TIERs
>
> Separating the application layer from the database layer into different TIERs lets you control what talks to what, instead of having everything on a flat network.
>
> A VPC supports up to three TIERs on the same virtual router.
### Before you begin
* Have an active Server subscription.
* If you don't have one yet, deploy a server first: [Deploy your server.](/docs-en/productos/servers/quickstart.md)
### Step 1. Access the Server subscription
Enter the Server subscription from its card in the service.

### Step 2. Open Networks/IP and create the VPC network
In the fields below your server name, open **Networks/IP**, select **VPC Networks** and click **Create VPC network**.

### Step 3. Name and locate the VPC
Enter a name to identify it easily, for example `VPC1`. Then add the location where you want to deploy this network.
If you leave it empty, we generate it automatically. Click **Continue**.

> #### 📘 The Super CIDR, auto-generated but yours
>
> We generate the Super CIDR automatically, but you can change it. If you do, note the range: the TIERs you create later must fit within it.
### Step 4. Add and name a TIER
When the VPC is created, you'll see a notice that it still doesn't contain any TIERs. Click the **three dots** on the VPC and choose **Add Tier**. Enter a name, for example `TIER1`. If you leave it empty, we'll fill it in for you.
The platform assigns a range by default `10.1.0.0/24`, which is contained within the Super CIDR `10.1.0.0/16`. When you're done, the VPC and its TIER appear in **Networks/IP → VPC Networks**.

> #### 👍 Use clear names from the start
>
> Naming VPCs and TIERs well (by function or by layer) saves you time when the network grows and you need to know at a glance what each thing is.
### Check the network from a server
When you connect a server to the TIER, confirm from inside that it has received the correct IP and gateway.
On Linux:
```shell
ip addr show # the IP and mask assigned to the server
ip route # the gateway (the virtual router)
```
On Windows, from PowerShell or CMD:
```powershell
ipconfig /all
```
To check connectivity with another server on the network, run `ping` to its IP. On Windows, the firewall blocks incoming ICMP by default, so allow it on the destination server with an inbound rule:
```powershell
New-NetFirewallRule -DisplayName "ICMPv4-In" -Protocol ICMPv4 -IcmpType 8 -Direction Inbound -Action Allow
```
### Plan ranges before growing
The biggest oversight when setting up multiple VPCs is overlapping ranges, which breaks routing as soon as you connect them. Reserve a different Super CIDR per VPC from the start.
| Item | VPC1 | VPC2 |
| ------------ | ------------- | ------------- |
| Super CIDR | `10.1.0.0/16` | `10.2.0.0/16` |
| example TIER | `10.1.0.0/24` | `10.2.0.0/24` |
### Next steps
* To connect two VPCs, create a second one (for example `VPC2` with `10.2.0.0/16`, without overlapping) and bring up the tunnel: [How to create a site-to-site VPN tunnel.](/docs-en/productos/servers/how-to/how-to-create-a-site-to-site-vpn-tunnel.md)
* The VPC is the only network type with site-to-site IPSec VPN, and you can connect it with VPCs from other cloud providers or with compatible equipment (Cisco ISR with IOS 12.4 or higher, Juniper J-Series routers with JunOS 9.5 or higher).
* To review the network types: [Server networks.](/docs-en/productos/servers/concepts/networks.md)
---
# Agent Instructions
This documentation is published with GitBook. GitBook is the documentation platform designed so that both humans and AI agents can read, navigate, and reason over technical content effectively. Learn more at gitbook.com.
## Querying This Documentation
If you need additional information that is not directly available in this page, you can query the documentation dynamically by asking a question.
Perform an HTTP GET request on the current page URL with the `ask` query parameter, and the optional `goal` query parameter:
```
GET https://docs.plenit.com/docs-en/productos/servers/how-to/how-to-create-a-vpc-and-associate-a-tier.md?ask=&goal=
```
`ask` is the immediate question: it should be specific, self-contained, and written in natural language.
`goal` is optional and describes the broader end goal you are ultimately trying to accomplish on behalf of the user. GitBook uses it to tailor the answer towards what is most useful for that goal.
The response will contain a direct answer to the question and relevant excerpts and sources from the documentation.
Use this mechanism when the answer is not explicitly present in the current page, you need clarification or additional context, or you want to retrieve related documentation sections.